m (→About: swarms to enemies) |
No edit summary |
||
| (27 intermediate revisions by 15 users not shown) | |||
| Line 1: | Line 1: | ||
| − | {{ |
+ | {{updated|U33}} |
{{mission infobox |
{{mission infobox |
||
| name = Point Extraction |
| name = Point Extraction |
||
| image = Point extraction icon.png |
| image = Point extraction icon.png |
||
| deposit = [[Minehead]] |
| deposit = [[Minehead]] |
||
| − | | objective = Collect [[Aquarq]] |
+ | | objective = Collect 7-10 [[Aquarq]] |
| + | | payout = 585-910 |
||
| + | | xppayout = 1750 |
||
}} |
}} |
||
| + | [[{{PAGENAME}}]] is a mission type in ''{{Gamename}}''. |
||
| ⚫ | |||
| ⚫ | A huge deposit of a glowing, blue crystal named {{icon resource|Aquarq}}[[Aquarq]] has been located, and the [[Dwarves]] are sent in to extract as many as possible. The [[Mine Head]], a heavily armored mining platform, is sent in to assist you. Point Extractions are the third unlockable mission type, the second being [[Salvage Operation]]. |
||
| ⚫ | |||
| ⚫ | Point Extraction missions always take place in a large cavern filled with |
||
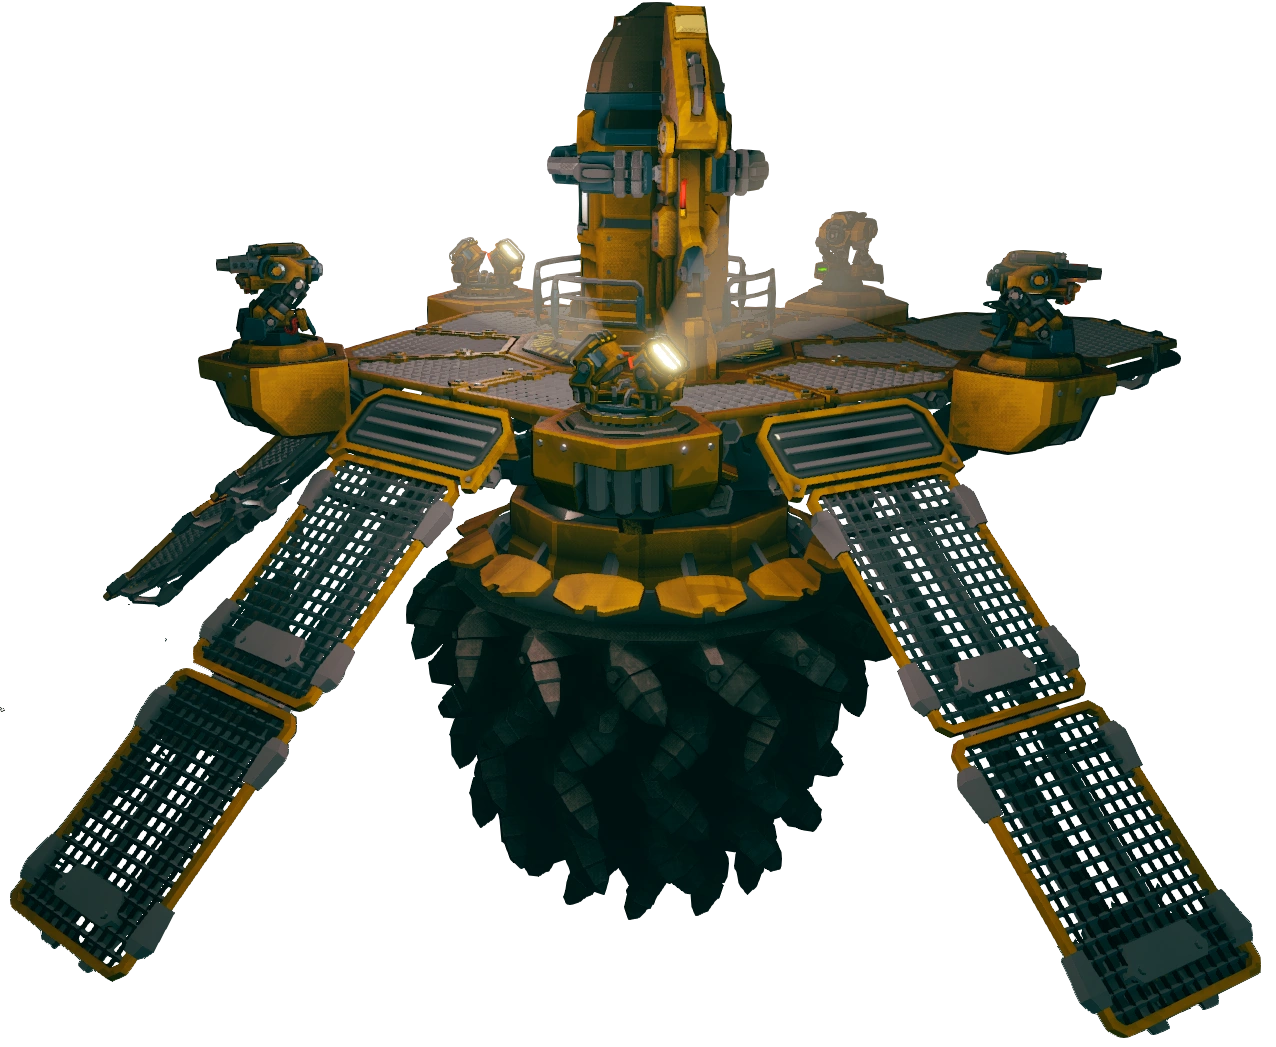
| + | [[File:Mine Head.png|300px|right|thumb|none|The Mine Head]] |
||
| ⚫ | The Aquarq that must be collected for the primary objective are embedded in the walls of the cavern. Small, blue crystals dot the location they are buried, and they must be dug out using [[ |
||
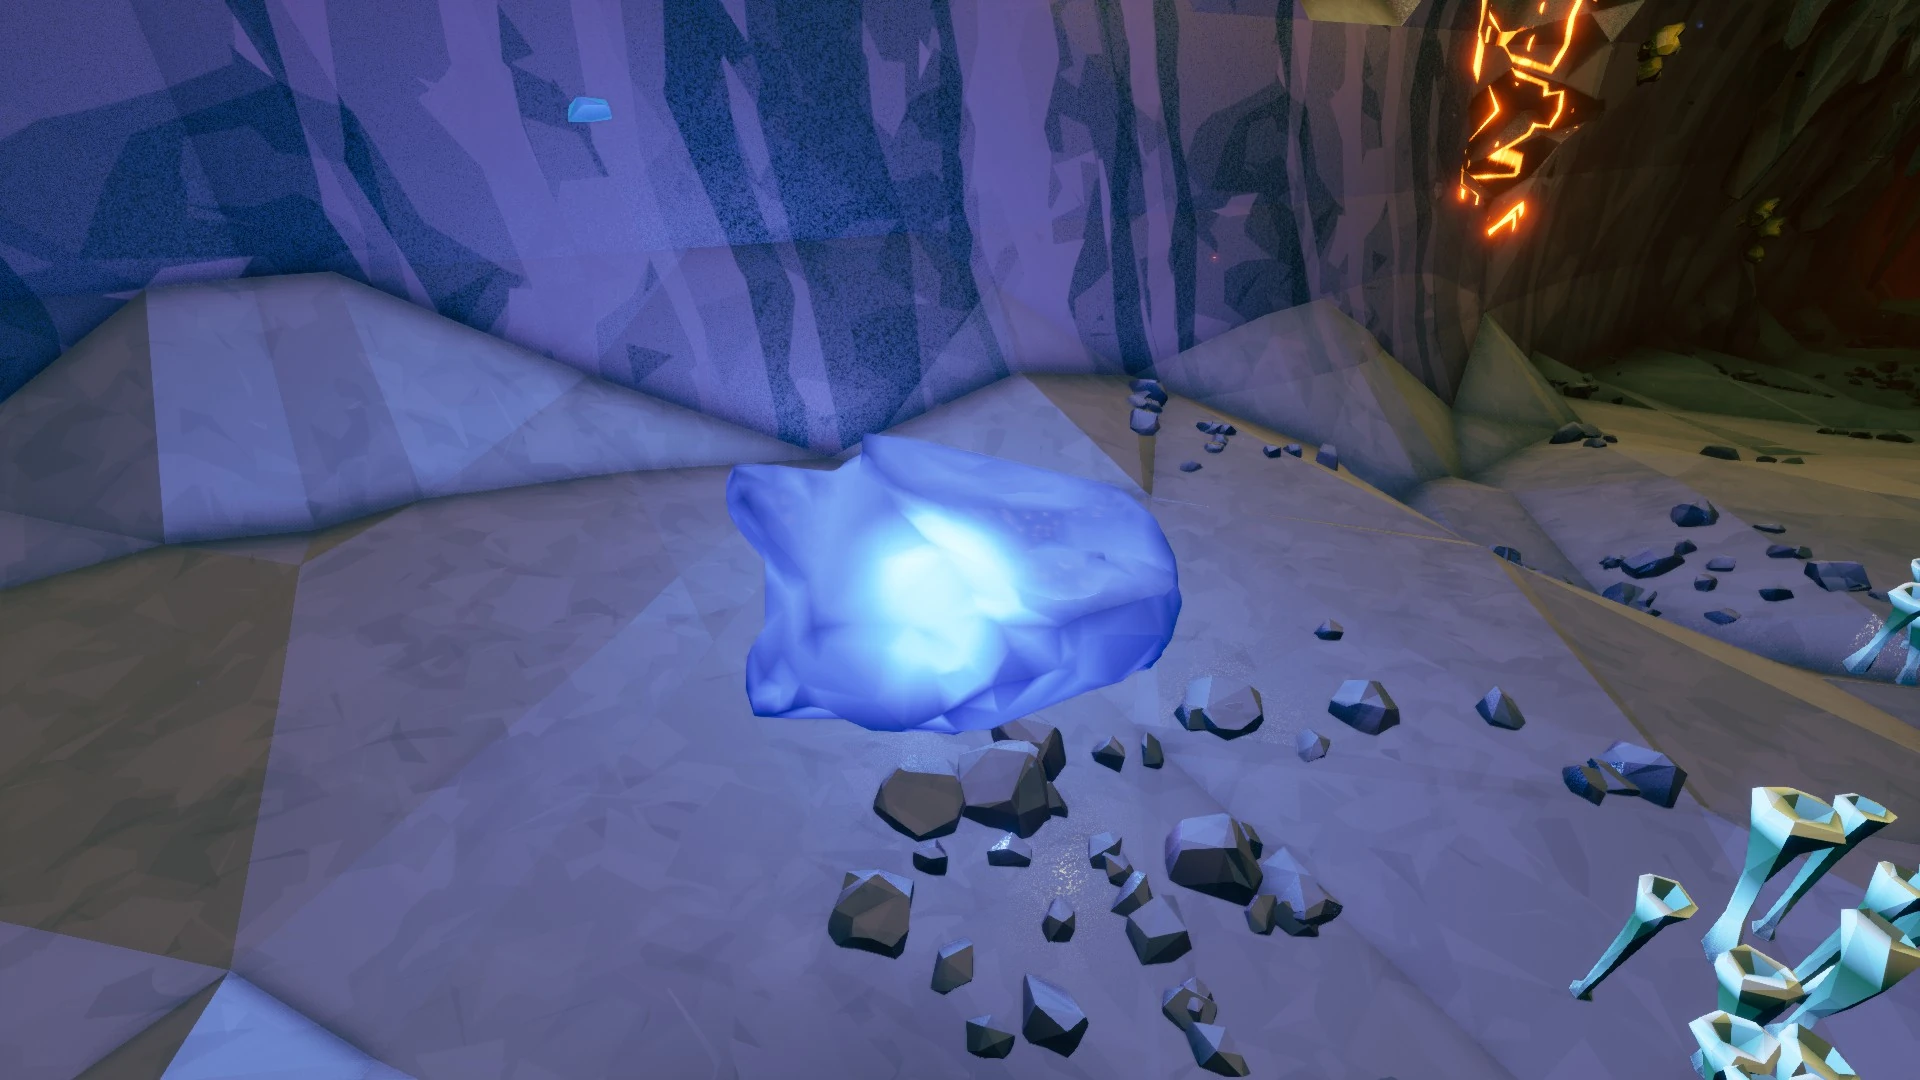
| + | [[File:Aquarq_Chunk.jpg|300px|right|thumb|none|An Aquarq extracted from the walls]] |
||
| + | == Collect Aquarqs == |
||
| − | Enemies in Point Extraction are far more common than any other mission type; they will attack frequently in large swarms. However, the automatic Sentry Turrets on the Minehead will assist the team in combat, and there is an abundance of [[Nitra]] {{icon resource|Nitra}} that can be used to order [[Resupply Pod|Resupply Pods.]] |
||
| ⚫ | Point Extraction missions always take place in a large cavern filled with {{icon resource|Aquarq}} [[Aquarq]]. The [[Drop Pod]] lands in the cavern, along with the [[Mine Head]], which lands shortly after the Drop Pod lands. The Mine Head acts as a central playing point throughout the mission. Similar to [[On-site Refining]], the [[M.U.L.E.]] is not present, and [[resources]] gathered by the team must be deposited into the Mine Head. |
||
| ⚫ | After the primary objective has been completed, a red button on the [[ |
||
| ⚫ | The [[Aquarq]] that must be collected for the primary objective are embedded in the walls of the cavern. Small, blue crystals dot the location they are buried, and they must be dug out using the [[Basic Pickaxe|pickaxe]] or other terrain destroying tools or weapons. Aquarq are large resources, and must be carried back to the Mine Head by hand. |
||
| ⚫ | |||
| + | |||
| ⚫ | After the primary objective has been completed, a red button on the [[Mine Head]] platform will appear, and can be interacted with. Pressing the button using the [Interact] key ("E" by default) will launch the Mine Head rocket and [[Mission Control]] will announce that they will send in the Drop Pod to extract the Dwarves after the rocket has been secured at the [[Space Rig]]. The Drop Pod will take two minutes to arrive, after which the Drop Pod will land and open for three more minutes before departing, with or without the Dwarves. |
||
| + | |||
| + | While you must complete your primary objective to finish the mission, you can choose to collect an optional [[Resources#Secondary_Objectives|secondary objective resource]] for a {{credits}} Credit and {{Xp}} Experience bonus upon mission completion. |
||
| + | |||
| ⚫ | |||
| + | Point Extraction missions take place in large, expansive open caves with various height levels. They always have at least one small tunnel that leads to a medium sized cave. Keep an sharp eye out for this cave, as it can be hard to spot. The [[Mine Head]] will always be positioned in the general center of the main cave. |
||
| + | |||
| + | == Objectives == |
||
| + | |||
| ⚫ | |||
| + | * Collect 7-10 [[Aquarq]]s |
||
The number of [[Aquarq]] to collect is dependent on the length of the mission. |
The number of [[Aquarq]] to collect is dependent on the length of the mission. |
||
| + | {|class="wikitable" style="text-align:center" |
||
| − | {{icon cave|length|2}} | {{icon cave|complexity|3}} : Length 2 | Complexity 3 - Collect 7 [[Aquarq]] |
||
| + | ! Length |
||
| + | ! Complexity |
||
| + | ! Objective |
||
| + | ! Primary Payout |
||
| ⚫ | |||
| + | |- |
||
| + | |{{icon cave|length|2}} |
||
| + | |{{icon cave|complexity|3}} |
||
| + | |Collect 7 Aquarq |
||
| + | |{{credits}} 585 {{Xp}} 1575 |
||
| + | |{{credits}} 195/{{tooltip|325|Hollomite and Dystrum payout}} |
||
| + | |- |
||
| + | |{{icon cave|length|3}} |
||
| + | |{{icon cave|complexity|3}} |
||
| + | |Collect 10 Aquarq |
||
| + | |{{credits}} 910 {{Xp}} 2450 |
||
| + | |{{credits}} 280/{{tooltip|350|Hollomite and Dystrum payout}} {{Xp}} 1260/{{tooltip|1120|Hollomite and Dystrum xp}} |
||
| + | |- |
||
| + | ! colspan="5" | Base Values (complexity/length bonus deducted) |
||
| + | |- |
||
| + | |{{icon cave|length|3}} |
||
| + | |{{icon cave|complexity|3}} |
||
| + | |Collect 10 Aquarq |
||
| + | |{{credits}} 650 {{Xp}} 1750 |
||
| + | |{{credits}} 200/{{tooltip|250|Hollomite and Dystrum payout}} {{Xp}} 900/{{tooltip|800|Hollomite and Dystrum xp}} |
||
| + | |} |
||
| + | === Secondary Objective === |
||
| − | {{icon cave|length|3}} | {{icon cave|complexity|3}} : Length 3 | Complexity 3 - Collect 10 [[Aquarq]] |
||
| ⚫ | |||
| ⚫ | |||
| ⚫ | |||
| ⚫ | |||
| + | {| |
||
| ⚫ | |||
| + | |- style="vertical-align: top;" |
||
| + | | width=220px | |
||
| + | {{icon resource|Fossil|34px}} Collect '''10 [[Alien Fossil]]''' |
||
| − | {{icon resource| |
+ | {{icon resource|Apoca bloom|34px}} Collect '''15 [[Apoca Bloom]]''' |
| − | {{icon resource| |
+ | {{icon resource|Boolo cap|34px}} Collect '''20 [[Boolo Cap]]''' |
| − | {{icon resource| |
+ | {{icon resource|Dystrum|34px}} Collect '''100 [[Dystrum]]''' |
| ⚫ | |||
| + | {{icon resource|Ebonut|34px}} Collect '''14 [[Ebonut]]''' |
||
| − | {{icon resource| |
+ | {{icon resource|Fleas|34px}} Exterminate '''10 [[Fester Flea]]''' |
| − | {{icon resource| |
+ | {{icon resource|Gunk Seed|34px}} Collect '''12 [[Gunk Seed]]''' |
| + | |||
| + | {{icon resource|Hollomite|34px}} Collect '''25 [[Hollomite]]''' |
||
| + | |} |
||
== Trivia == |
== Trivia == |
||
| + | * Deep Rock Galactic refuses to send in the Drop Pod to save the team until ''after'' the goods are secured. This is even more evidence showing they prioritize profit over employee safety, and consider employees disposable. |
||
| ⚫ | |||
| + | |||
| − | <br/> |
||
| + | ==Bugs== |
||
| + | * Mission Control will announce that the [[M.U.L.E.]] has been secured while ascending in the Drop Pod, despite the M.U.L.E. not being present in this mission type. |
||
| + | |||
| + | |||
{{Mission nav}} |
{{Mission nav}} |
||
| + | |||
| + | [[es:Punto de Extracción]] |
||
Revision as of 22:13, 12 May 2021
| Point Extraction | |
|---|---|
| Mission Details | |
| Cave Type | Unknown |
| Deposit Type | Minehead |
| Objective(s) | Collect 7-10 Aquarq |
| Payout | |
| XP Payout | |
Point Extraction is a mission type in Deep Rock Galactic.
A huge deposit of a glowing, blue crystal named ![]() Aquarq has been located, and the Dwarves are sent in to extract as many as possible. The Mine Head, a heavily armored mining platform, is sent in to assist you. Point Extractions are the third unlockable mission type, the second being Salvage Operation.
Aquarq has been located, and the Dwarves are sent in to extract as many as possible. The Mine Head, a heavily armored mining platform, is sent in to assist you. Point Extractions are the third unlockable mission type, the second being Salvage Operation.
The Mine Head
An Aquarq extracted from the walls
Collect Aquarqs
Point Extraction missions always take place in a large cavern filled with ![]() Aquarq. The Drop Pod lands in the cavern, along with the Mine Head, which lands shortly after the Drop Pod lands. The Mine Head acts as a central playing point throughout the mission. Similar to On-site Refining, the M.U.L.E. is not present, and resources gathered by the team must be deposited into the Mine Head.
Aquarq. The Drop Pod lands in the cavern, along with the Mine Head, which lands shortly after the Drop Pod lands. The Mine Head acts as a central playing point throughout the mission. Similar to On-site Refining, the M.U.L.E. is not present, and resources gathered by the team must be deposited into the Mine Head.
The Aquarq that must be collected for the primary objective are embedded in the walls of the cavern. Small, blue crystals dot the location they are buried, and they must be dug out using the pickaxe or other terrain destroying tools or weapons. Aquarq are large resources, and must be carried back to the Mine Head by hand.
After the primary objective has been completed, a red button on the Mine Head platform will appear, and can be interacted with. Pressing the button using the [Interact] key ("E" by default) will launch the Mine Head rocket and Mission Control will announce that they will send in the Drop Pod to extract the Dwarves after the rocket has been secured at the Space Rig. The Drop Pod will take two minutes to arrive, after which the Drop Pod will land and open for three more minutes before departing, with or without the Dwarves.
While you must complete your primary objective to finish the mission, you can choose to collect an optional secondary objective resource for a ![]() Credit and
Credit and ![]() Experience bonus upon mission completion.
Experience bonus upon mission completion.
Cave
Point Extraction missions take place in large, expansive open caves with various height levels. They always have at least one small tunnel that leads to a medium sized cave. Keep an sharp eye out for this cave, as it can be hard to spot. The Mine Head will always be positioned in the general center of the main cave.
Objectives
Primary Objective
- Collect 7-10 Aquarqs
The number of Aquarq to collect is dependent on the length of the mission.
| Length | Complexity | Objective | Primary Payout | Secondary Payout |
|---|---|---|---|---|
| Collect 7 Aquarq | ||||
| Collect 10 Aquarq | ||||
| Base Values (complexity/length bonus deducted) | ||||
| Collect 10 Aquarq | ||||
Secondary Objective
Unlike all other mission types besides On-site Refining, Point Extraction missions have Dystrum as a possible secondary objective.
Possible Secondary Objectives:
|
|
|
Trivia
- Deep Rock Galactic refuses to send in the Drop Pod to save the team until after the goods are secured. This is even more evidence showing they prioritize profit over employee safety, and consider employees disposable.
Bugs
- Mission Control will announce that the M.U.L.E. has been secured while ascending in the Drop Pod, despite the M.U.L.E. not being present in this mission type.
| ||||||||