m (Fixed hoverboot and field medic description) |
FabrizioBS (talk | contribs) (U34) |
||
| (32 intermediate revisions by 14 users not shown) | |||
| Line 1: | Line 1: | ||
| − | {{Updated| |
+ | {{Updated|U34}} |
[[File:Kpi perks.jpg|thumb|right|450px|Perks unlocking at the Key Performance Indicator]] |
[[File:Kpi perks.jpg|thumb|right|450px|Perks unlocking at the Key Performance Indicator]] |
||
=== Perks === |
=== Perks === |
||
| − | Perks are optional bonuses and abilities the player may equip on a Dwarf. Perks were implemented in [[Update 14: Feature Creep]] as a major new feature and reworked with [[Update 28: Feeling Perky]]. They are purchased using '''Perk Points''' {{Perk points}} which are awarded by completing [[Perks#Milestones|Milestones.]] Once a milestone has been completed, the Perk Point reward can be claimed at your [[Space_Rig |
+ | Perks are optional bonuses and abilities the player may equip on a Dwarf. Perks were implemented in [[Update 14: Feature Creep]] as a major new feature and reworked with [[Update 28: Feeling Perky]]. They are purchased using '''Perk Points''' {{Perk points}} which are awarded by completing [[Perks#Milestones|Milestones.]] Once a milestone has been completed, the Perk Point reward can be claimed at your [[Space_Rig#Communal_Area|Key Performance Indicator terminal]] in the [[Space Rig|Space Rig.]] They offer small boosts to certain stats or give certain abilities, such as increasing the amount of minerals a Dwarf can hold in their pouch, or allowing a Dwarf to revive someone instantly once per mission. Once unlocked, all classes can equip a perk. Players start with one {{active}} {{active|Active}} and one {{passive}} {{passive|Passive}} Perk Slot. Active perks are activated as abilities by the player using a button, while passive perks are always active and always give a bonus. Some active perks also have a passive effect which does not need to be activated. An additional Active Slot is unlocked after [[Promotion|Promoting]] each dwarf, and two extra Passive Slots can be unlocked for all dwarfs at perk Tier 4 and Tier 9. A list of perks and their functions can be found just [[#Perk_Tiers|below]]. |
=== Milestones === |
=== Milestones === |
||
| − | Perks are purchased using '''Perk Points''' {{Perk points}}, which can be acquired by completing [[Perks#Milestones_2|Milestones]]. Milestones may include completing missions in certain biomes, completing missions with certain mutators, gaining levels with a class, or unlocking a certain number of accessories. Milestones and milestone progress can be checked at your [[Space_Rig |
+ | Perks are purchased using '''Perk Points''' {{Perk points}}, which can be acquired by completing [[Perks#Milestones_2|Milestones]]. Milestones may include completing missions in certain biomes, completing missions with certain mutators, gaining levels with a class, or unlocking a certain number of accessories. Milestones and milestone progress can be checked at your [[Space_Rig#Communal_Area|Key Performance Indicator terminal]]. Milestones have levels, typically from 1 to 5, with each level awarding perk points upon completion. For example, completing the 'Complete 1 Deep Dive' milestone will award points, and also unlock the 'Complete 3 Deep Dives' milestone, which will require the player to complete three additional deep dives. Milestones are not dwarf specific, and each class shares completed milestones and milestone progress. |
=== Perk Tiers === |
=== Perk Tiers === |
||
| − | Perks are divided into tiers. To progress to the the next tier of perks, you must buy a set amount of perks from the previous |
+ | Perks are divided into tiers. To progress to the the next tier of perks, you must buy a set amount of perks from the previous tiers. For example, to unlock tier 3 perks you must buy three tier 2 or tier 1 perks. Additional passive perk slots are available for purchase at tier 4 and at tier 9. Higher tiers may also contain higher levels of perks. The previous perk level must be purchased before you may buy the next level, even if you have access to that level's tier. |
{{clear}} |
{{clear}} |
||
{{Perk Nav}} |
{{Perk Nav}} |
||
| − | {| class="wikitable mw-collapsible" style="text-align:center; width:100%; |
+ | {| class="wikitable mw-collapsible mw-collapsed" style="text-align:center; width:100%; |
| − | |- |
+ | |- |
! style="padding:10px;" colspan="6" | List of available <big><span style="color:#F5A432">Tier 1</span></big> perks |
! style="padding:10px;" colspan="6" | List of available <big><span style="color:#F5A432">Tier 1</span></big> perks |
||
|- style="vertical-align: top;" |
|- style="vertical-align: top;" |
||
| width="16.6%" | {{Icon perk|field medic}} |
| width="16.6%" | {{Icon perk|field medic}} |
||
| − | + | {{active}} '''[[Field Medic]]''' <sup>I</sup> |
|
Costs {{Perk points}} 3 perk points |
Costs {{Perk points}} 3 perk points |
||
| − | + | {{passive|Passive:}} Leave no dwarf behind! You revive teammates 15% faster!<br> |
|
| − | + | {{active|Active:}} Once per mission, you can get a downed teammate instantly back on their feet! |
|
| width="16.6%" | {{Icon perk|loveable}} |
| width="16.6%" | {{Icon perk|loveable}} |
||
| − | + | {{passive}} '''[[Friendly]]''' <sup>I</sup> |
|
Costs {{Perk points}} 2 perk points |
Costs {{Perk points}} 2 perk points |
||
| Line 35: | Line 35: | ||
Through the power of friendship you both take and deal 50% less damage from friendly fire! |
Through the power of friendship you both take and deal 50% less damage from friendly fire! |
||
| width="16.6%" | {{Icon perk|leech sense}} |
| width="16.6%" | {{Icon perk|leech sense}} |
||
| − | + | {{active}} '''[[Heightened Senses]]''' <sup>I</sup> |
|
Costs {{Perk points}} 3 perk points |
Costs {{Perk points}} 3 perk points |
||
| − | + | {{passive|Passive:}} You get an early warning when a creature is about to grab you.<br> |
|
| − | + | {{active|Active:}} 1 times per mission, you can escape after being grabbed, killing your captor in the process! |
|
| width="16.6%" | {{Icon perk|second wind}} |
| width="16.6%" | {{Icon perk|second wind}} |
||
| − | + | {{passive}} '''[[Second Wind]]''' <sup>I</sup> |
|
Costs {{Perk points}} 2 perk points |
Costs {{Perk points}} 2 perk points |
||
| − | Get a |
+ | Get a 8% sprint speed boost.<br> |
Effect activates after running for 5 seconds. |
Effect activates after running for 5 seconds. |
||
| width="16.6%" | {{Icon perk|see you in hell}} |
| width="16.6%" | {{Icon perk|see you in hell}} |
||
| − | + | {{active}} '''[[See You In Hell]]''' <sup>I</sup> |
|
Costs {{Perk points}} 3 perk points |
Costs {{Perk points}} 3 perk points |
||
| − | + | {{passive|Passive:}} Right after an enemy hits you with a melee attack you get a temporary melee damage bonus.<br> |
|
| − | + | {{active|Active:}} 3 times each mission, you can trigger a large neuro-pulse explosion after you go down. A residual neuro-electric field will electrocute and scare off enemies.<br>(2 minute cooldown) |
|
| width="16.6%" | {{Icon perk|thorns}} |
| width="16.6%" | {{Icon perk|thorns}} |
||
| − | + | {{passive}} '''[[Thorns]]''' <sup>I</sup> |
|
Costs {{Perk points}} 2 perk points |
Costs {{Perk points}} 2 perk points |
||
| Line 63: | Line 63: | ||
|} |
|} |
||
| − | {| class="wikitable mw-collapsible" style="text-align:center; width:100%" |
+ | {| class="wikitable mw-collapsible mw-collapsed" style="text-align:center; width:100%" |
|- |
|- |
||
! style="padding:10px;" colspan="6" | List of available <big><span style="color:#F5A432">Tier 2</span></big> perks |
! style="padding:10px;" colspan="6" | List of available <big><span style="color:#F5A432">Tier 2</span></big> perks |
||
| Line 70: | Line 70: | ||
|- style="vertical-align: top;" |
|- style="vertical-align: top;" |
||
| width="16.6%" | {{Icon perk|expert depositor}} |
| width="16.6%" | {{Icon perk|expert depositor}} |
||
| − | + | {{passive}} '''[[Veteran Depositor]]''' <sup>I</sup> |
|
Costs {{Perk points}} 2 perk points |
Costs {{Perk points}} 2 perk points |
||
| − | Expert |
+ | Expert bucket handling! You now deposit valuables into the MULE and Drop Pod 20% faster!<br> |
| − | + | 20% Damage Reduction while within 7m of the MULE or other deposit points! |
|
| width="16.6%" | {{Icon perk|field medic}} |
| width="16.6%" | {{Icon perk|field medic}} |
||
| − | + | {{active}} '''[[Field Medic]]''' <sup>II</sup> |
|
Costs {{Perk points}} 5 perk points |
Costs {{Perk points}} 5 perk points |
||
| − | + | {{passive|Passive:}} Leave no dwarf behind! You revive teammates 20% faster!<br> |
|
| − | + | {{active|Active:}} Once per mission, you can get a downed teammate instantly back on their feet! |
|
| width="16.6%" | {{Icon perk|leech sense}} |
| width="16.6%" | {{Icon perk|leech sense}} |
||
| − | + | {{active}} '''[[Heightened Senses]]''' <sup>II</sup> |
|
Costs {{Perk points}} 7 perk points |
Costs {{Perk points}} 7 perk points |
||
| − | + | {{passive|Passive:}} You get an early warning when a creature is about to grab you.<br> |
|
| − | + | {{active|Active:}} 2 times per mission, you can escape after being grabbed, killing your captor in the process!<br> |
|
(90 seconds cooldown) |
(90 seconds cooldown) |
||
| width="16.6%" | {{Icon perk|second wind}} |
| width="16.6%" | {{Icon perk|second wind}} |
||
| − | + | {{passive}} '''[[Second Wind]]''' <sup>II</sup> |
|
Costs {{Perk points}} 3 perk points |
Costs {{Perk points}} 3 perk points |
||
| − | Get a |
+ | Get a 8% sprint speed boost.<br> |
Effect activates after running for 4.5 seconds. |
Effect activates after running for 4.5 seconds. |
||
| width="16.6%" | {{Icon perk|see you in hell}} |
| width="16.6%" | {{Icon perk|see you in hell}} |
||
| − | + | {{active}} '''[[See You In Hell]]''' <sup>II</sup> |
|
Costs {{Perk points}} 7 perk points |
Costs {{Perk points}} 7 perk points |
||
| − | + | {{passive|Passive:}} Right after an enemy hits you with a melee attack you get a temporary melee damage bonus.<br> |
|
| − | + | {{active|Active:}} 3 times each mission, you can trigger a large neuro-pulse explosion after you go down. A residual neuro-electric field will electrocute and scare off enemies.<br>(2 minute cooldown)<br> |
|
Neuro-pulse radius increased! |
Neuro-pulse radius increased! |
||
| width="16.6%" | {{Icon perk|thorns}} |
| width="16.6%" | {{Icon perk|thorns}} |
||
| − | + | {{passive}} '''[[Thorns]]''' <sup>II</sup> |
|
Costs {{Perk points}} 5 perk points |
Costs {{Perk points}} 5 perk points |
||
| Line 114: | Line 114: | ||
|} |
|} |
||
| − | {| class="wikitable mw-collapsible" style="text-align:center; width:100%" |
+ | {| class="wikitable mw-collapsible mw-collapsed" style="text-align:center; width:100%" |
|- |
|- |
||
! style="padding:10px;" colspan="6" | List of available <big><span style="color:#F5A432">Tier 3</span></big> perks |
! style="padding:10px;" colspan="6" | List of available <big><span style="color:#F5A432">Tier 3</span></big> perks |
||
| Line 121: | Line 121: | ||
|- style="vertical-align: top;" |
|- style="vertical-align: top;" |
||
| width="16.6%" | {{Icon perk|expert depositor}} |
| width="16.6%" | {{Icon perk|expert depositor}} |
||
| − | + | {{passive}} '''[[Veteran Depositor]]''' <sup>II</sup> |
|
Costs {{Perk points}} 3 perk points |
Costs {{Perk points}} 3 perk points |
||
| − | Expert |
+ | Expert bucket handling! You now deposit valuables into the MULE and Drop Pod 30% faster!<br> |
| − | + | 20% Damage Reduction while within 7m of the MULE or other deposit points! |
|
| width="16.6%" | {{Icon perk|field medic}} |
| width="16.6%" | {{Icon perk|field medic}} |
||
| − | + | {{active}} '''[[Field Medic]]''' <sup>III</sup> |
|
Costs {{Perk points}} 7 perk points |
Costs {{Perk points}} 7 perk points |
||
| − | + | {{passive|Passive:}} Leave no dwarf behind! You revive teammates 25% faster!<br> |
|
| − | + | {{active|Active:}} Once per mission, you can get a downed teammate instantly back on their feet! |
|
| width="16.6%" | {{Icon perk|resupplier}} |
| width="16.6%" | {{Icon perk|resupplier}} |
||
| − | + | {{passive}} '''[[Resupplier]]''' <sup>I</sup> |
|
Costs {{Perk points}} 2 perk points |
Costs {{Perk points}} 2 perk points |
||
| − | You’re a busy dwarf, got aliens to shoot!<br>Stock up on Ammo and Health |
+ | You’re a busy dwarf, got aliens to shoot!<br>Stock up on Ammo and Health 20% faster at the Resupply Pod.<br> |
| − | Regain an extra |
+ | Regain an extra 10% health when you resupply!<br> |
After resupplying, all weapons instantly reload! |
After resupplying, all weapons instantly reload! |
||
| width="16.6%" | {{Icon perk|iron will}} |
| width="16.6%" | {{Icon perk|iron will}} |
||
| − | + | {{active}} '''[[Iron Will]]''' <sup>I</sup> |
|
Costs {{Perk points}} 3 perk points |
Costs {{Perk points}} 3 perk points |
||
| − | + | {{active|Active:}} Never give up! Once per mission, get back into the fight with all your weapons reloaded and a rage-fueled strength for a 6 second last stand before going down for good!<br> |
|
While in this state you move faster, hit harder, and are resistant to slowdowns.<br> |
While in this state you move faster, hit harder, and are resistant to slowdowns.<br> |
||
Make it count! |
Make it count! |
||
| width="16.6%" | {{Icon perk|leech sense}} |
| width="16.6%" | {{Icon perk|leech sense}} |
||
| − | + | {{active}} '''[[Heightened Senses]]''' <sup>III</sup> |
|
Costs {{Perk points}} 11 perk points (21 total) |
Costs {{Perk points}} 11 perk points (21 total) |
||
| − | + | {{passive|Passive:}} You get an early warning when a creature is about to grab you.<br> |
|
| − | + | {{active|Active:}} 2 times per mission, you can escape after being grabbed, killing your captor in the process!<br> |
|
(5 seconds cooldown) |
(5 seconds cooldown) |
||
| width="16.6%" | {{Icon perk|second wind}} |
| width="16.6%" | {{Icon perk|second wind}} |
||
| − | + | {{passive}} '''[[Second Wind]]''' <sup>III</sup> |
|
Costs {{Perk points}} 5 perk points |
Costs {{Perk points}} 5 perk points |
||
| − | Get a |
+ | Get a 12% sprint speed boost.<br> |
Effect activates after running for 4.5 seconds. |
Effect activates after running for 4.5 seconds. |
||
|- style="vertical-align: top;" |
|- style="vertical-align: top;" |
||
| width="16.6%" | {{Icon perk|see you in hell}} |
| width="16.6%" | {{Icon perk|see you in hell}} |
||
| − | + | {{active}} '''[[See You In Hell]]''' <sup>III</sup> |
|
Costs {{Perk points}} 11 perk points (21 total) |
Costs {{Perk points}} 11 perk points (21 total) |
||
| − | + | {{passive|Passive:}} Right after an enemy hits you with a melee attack you get a temporary melee damage bonus.<br> |
|
| − | + | {{active|Active:}} 3 times each mission, you can trigger a large neuro-pulse explosion after you go down. A residual neuro-electric field will electrocute and scare off enemies.<br>(1 minute cooldown)<br> |
|
Neuro-pulse radius increased! |
Neuro-pulse radius increased! |
||
| width="16.6%" | {{Icon perk|thorns}} |
| width="16.6%" | {{Icon perk|thorns}} |
||
| − | + | {{passive}} '''[[Thorns]]''' <sup>III</sup> |
|
Costs {{Perk points}} 8 perk points |
Costs {{Perk points}} 8 perk points |
||
| Line 181: | Line 181: | ||
Any time an enemy hits you with a melee attack it will itself take 18 damage. |
Any time an enemy hits you with a melee attack it will itself take 18 damage. |
||
| width="16.6%" | {{Icon perk|thick soles}} |
| width="16.6%" | {{Icon perk|thick soles}} |
||
| − | + | {{active}} '''[[Hover Boots]]''' <sup>I</sup> |
|
Costs {{Perk points}} 3 perk points |
Costs {{Perk points}} 3 perk points |
||
| − | + | {{active|Active:}} Fancy boots that let you hover in midair for 2 seconds.<br> |
|
(120 seconds cooldown) |
(120 seconds cooldown) |
||
|} |
|} |
||
| − | {| class="wikitable mw-collapsible" style="text-align:center; width:100%" |
+ | {| class="wikitable mw-collapsible mw-collapsed" style="text-align:center; width:100%" |
|- |
|- |
||
! style="padding:10px;" colspan="6" | List of available <big><span style="color:#F5A432">Tier 4</span></big> perks |
! style="padding:10px;" colspan="6" | List of available <big><span style="color:#F5A432">Tier 4</span></big> perks |
||
| Line 196: | Line 196: | ||
|- style="vertical-align: top;" |
|- style="vertical-align: top;" |
||
| width="16.6%" | {{Icon perk|berzerker}} |
| width="16.6%" | {{Icon perk|berzerker}} |
||
| − | + | {{active}} '''[[Berzerker]]''' <sup>I</sup> |
|
Costs {{Perk points}} 3 perk points |
Costs {{Perk points}} 3 perk points |
||
| − | + | {{active|Active:}} Go berzerk for 10 seconds during which you get boosted melee damage and a lightning-fast pickaxe Power Attack recharge.<br> |
|
(10 minutes cooldown) |
(10 minutes cooldown) |
||
| width="16.6%" | {{icon perk|expert depositor}} |
| width="16.6%" | {{icon perk|expert depositor}} |
||
| − | + | {{passive}} '''[[Veteran Depositor]]''' <sup>III</sup> |
|
Costs {{Perk points}} 5 perk points |
Costs {{Perk points}} 5 perk points |
||
| − | Expert |
+ | Expert bucket handling! You now deposit valuables into the MULE and Drop Pod 40% faster!<br> |
| − | + | 20% Damage Reduction while within 7m of the MULE or other deposit points! |
|
| width="16.6%" | {{Icon perk|field medic}} |
| width="16.6%" | {{Icon perk|field medic}} |
||
| − | + | {{active}} '''[[Field Medic]]''' <sup>IV</sup> |
|
Costs {{Perk points}} 9 perk points (24 total) |
Costs {{Perk points}} 9 perk points (24 total) |
||
| − | + | {{passive|Passive:}} Leave no dwarf behind! You revive teammates 30% faster!<br> |
|
Upon reviving someone, nearby enemies flee! |
Upon reviving someone, nearby enemies flee! |
||
| − | + | {{active|Active:}} Once per mission, you can get a downed teammate instantly back on their feet! |
|
| width="16.6%" | {{Icon perk|red sugar rocks}} |
| width="16.6%" | {{Icon perk|red sugar rocks}} |
||
| − | + | {{passive}} '''[[Sweet Tooth]]''' <sup>I</sup> |
|
Costs {{Perk points}} 2 perk points |
Costs {{Perk points}} 2 perk points |
||
| − | Getting a taste for that stuff! Get |
+ | Getting a taste for that stuff! Get 10% more healing from consuming Red Sugar! |
| width="16.6%" | {{Icon perk|resupplier}} |
| width="16.6%" | {{Icon perk|resupplier}} |
||
| − | + | {{passive}} '''[[Resupplier]]''' <sup>II</sup> |
|
Costs {{Perk points}} 3 perk points |
Costs {{Perk points}} 3 perk points |
||
| − | You’re a busy dwarf, got aliens to shoot!<br>Stock up on Ammo and Health |
+ | You’re a busy dwarf, got aliens to shoot!<br>Stock up on Ammo and Health 30% faster at the Resupply Pod.<br> |
| − | Regain an extra |
+ | Regain an extra 15% health when you resupply!<br> |
After resupplying, all weapons instantly reload! |
After resupplying, all weapons instantly reload! |
||
| width="16.6%" | {{Icon perk|iron will}} |
| width="16.6%" | {{Icon perk|iron will}} |
||
| − | + | {{active}} '''[[Iron Will]]''' <sup>II</sup> |
|
Costs {{Perk points}} 5 perk points |
Costs {{Perk points}} 5 perk points |
||
| − | + | {{active|Active:}} Never give up! Once per mission, get back into the fight with all your weapons reloaded and a rage-fueled strength for a 8 second last stand before going down for good!<br> |
|
While in this state you move faster, hit harder, and are resistant to slowdowns.<br> |
While in this state you move faster, hit harder, and are resistant to slowdowns.<br> |
||
Make it count! |
Make it count! |
||
|- style="vertical-align: top;" |
|- style="vertical-align: top;" |
||
| width="16.6%" | {{Icon perk|elemental insulation}} |
| width="16.6%" | {{Icon perk|elemental insulation}} |
||
| − | + | {{passive}} '''[[Elemental Insulation]]''' <sup>I</sup> |
|
Costs {{Perk points}} 2 perk points |
Costs {{Perk points}} 2 perk points |
||
| − | Get |
+ | Get 20% resistance to all elemental damage. |
| width="16.6%" | {{Icon perk|second wind}} |
| width="16.6%" | {{Icon perk|second wind}} |
||
| − | + | {{passive}} '''[[Second Wind]]''' <sup>IV</sup> |
|
Costs {{Perk points}} 7 perk points (17 total) |
Costs {{Perk points}} 7 perk points (17 total) |
||
| − | Get a |
+ | Get a 12% sprint speed boost.<br> |
Effect activates after running for 4 seconds. |
Effect activates after running for 4 seconds. |
||
| width="16.6%" | {{Icon perk|thorns}} |
| width="16.6%" | {{Icon perk|thorns}} |
||
| − | + | {{passive}} '''[[Thorns]]''' <sup>IV</sup> |
|
Costs {{Perk points}} 11 perk points (26 total) |
Costs {{Perk points}} 11 perk points (26 total) |
||
| Line 260: | Line 260: | ||
Any time an enemy hits you with a melee attack it will itself take 24 damage. |
Any time an enemy hits you with a melee attack it will itself take 24 damage. |
||
| width="16.6%" | {{Icon perk|more perks}} |
| width="16.6%" | {{Icon perk|more perks}} |
||
| − | + | {{passive}} '''[[New Passive Perk Slot]]''' <sup>I</sup> |
|
Costs {{Perk points}} 15 perk points |
Costs {{Perk points}} 15 perk points |
||
| Line 266: | Line 266: | ||
Moving on up! Equip up to 2 passive perks at a time! |
Moving on up! Equip up to 2 passive perks at a time! |
||
| width="16.6%" | {{Icon perk|thick soles}} |
| width="16.6%" | {{Icon perk|thick soles}} |
||
| − | + | {{active}} '''[[Hover Boots]]''' <sup>II</sup> |
|
Costs {{Perk points}} 5 perk points |
Costs {{Perk points}} 5 perk points |
||
| − | + | {{active|Active:}} Fancy boots that let you hover in midair for 2.5 seconds.<br> |
|
(105 seconds cooldown) |
(105 seconds cooldown) |
||
|} |
|} |
||
| − | {| class="wikitable mw-collapsible" style="text-align:center; width:100%" |
+ | {| class="wikitable mw-collapsible mw-collapsed" style="text-align:center; width:100%" |
|- |
|- |
||
! style="padding:10px;" colspan="6" | List of available <big><span style="color:#F5A432">Tier 5</span></big> perks |
! style="padding:10px;" colspan="6" | List of available <big><span style="color:#F5A432">Tier 5</span></big> perks |
||
| Line 281: | Line 281: | ||
|- style="vertical-align: top;" |
|- style="vertical-align: top;" |
||
| width="16.6%" | {{Icon perk|berzerker}} |
| width="16.6%" | {{Icon perk|berzerker}} |
||
| − | + | {{active}} '''[[Berzerker]]''' <sup>II</sup> |
|
Costs {{Perk points}} 5 perk points |
Costs {{Perk points}} 5 perk points |
||
| − | + | {{active|Active:}} Go berzerk for 10 seconds during which you get boosted melee damage and a lightning-fast pickaxe Power Attack recharge.<br> |
|
(8 minutes cooldown) |
(8 minutes cooldown) |
||
| width="16.6%" | {{icon perk|expert depositor}} |
| width="16.6%" | {{icon perk|expert depositor}} |
||
| − | + | {{passive}} '''[[Veteran Depositor]]''' <sup>IV</sup> |
|
Costs {{Perk points}} 7 perk points (17 total) |
Costs {{Perk points}} 7 perk points (17 total) |
||
| − | Expert |
+ | Expert bucket handling! You now deposit valuables into the MULE and Drop Pod 50% faster!<br> |
| − | + | 30% Damage Reduction while within 7m of the MULE! |
|
| width="16.6%" | {{Icon perk|red sugar rocks}} |
| width="16.6%" | {{Icon perk|red sugar rocks}} |
||
| − | + | {{passive}} '''[[Sweet Tooth]]''' <sup>II</sup> |
|
Costs {{Perk points}} 5 perk points |
Costs {{Perk points}} 5 perk points |
||
| − | Getting a taste for that stuff! Get |
+ | Getting a taste for that stuff! Get 20% more healing from consuming Red Sugar! |
| width="16.6%" | {{Icon perk|resupplier}} |
| width="16.6%" | {{Icon perk|resupplier}} |
||
| − | + | {{passive}} '''[[Resupplier]]''' <sup>III</sup> |
|
Costs {{Perk points}} 5 perk points |
Costs {{Perk points}} 5 perk points |
||
| − | You’re a busy dwarf, got aliens to shoot!<br>Stock up on Ammo and Health |
+ | You’re a busy dwarf, got aliens to shoot!<br>Stock up on Ammo and Health 40% faster at the Resupply Pod.<br> |
| − | Regain an extra |
+ | Regain an extra 20% health when you resupply!<br> |
After resupplying, all weapons instantly reload! |
After resupplying, all weapons instantly reload! |
||
| width="16.6%" | {{Icon perk|unstoppable}} |
| width="16.6%" | {{Icon perk|unstoppable}} |
||
| − | + | {{passive}} '''[[Unstoppable]]''' <sup>I</sup> |
|
Costs {{Perk points}} 2 perk points |
Costs {{Perk points}} 2 perk points |
||
| − | Nothing holds you back! Environmental slow-down effects are reduced by |
+ | Nothing holds you back! Environmental slow-down effects are reduced by 20%!<br> |
| − | You move |
+ | You move 10% faster while carrying heavy objects! |
| width="16.6%" | {{Icon perk|iron will}} |
| width="16.6%" | {{Icon perk|iron will}} |
||
| − | + | {{active}} '''[[Iron Will]]''' <sup>III</sup> |
|
Costs {{Perk points}} 7 perk points |
Costs {{Perk points}} 7 perk points |
||
| − | + | {{active|Active:}} Never give up! Once per mission, get back into the fight with all your weapons reloaded and a rage-fueled strength for a 10 second last stand before going down for good!<br> |
|
While in this state you move faster, hit harder, and are resistant to slowdowns.<br> |
While in this state you move faster, hit harder, and are resistant to slowdowns.<br> |
||
Make it count! |
Make it count! |
||
|- style="vertical-align: top;" |
|- style="vertical-align: top;" |
||
| width="16.6%" | {{Icon perk|strong arm}} |
| width="16.6%" | {{Icon perk|strong arm}} |
||
| − | + | {{passive}} '''[[Strong Arm]]''' <sup>I</sup> |
|
Costs {{Perk points}} 2 perk points |
Costs {{Perk points}} 2 perk points |
||
| − | You throw flares with |
+ | You throw flares with 20% more force than the average Dwarf! Woosh!<br> |
| − | Gems and other heavy objects get a |
+ | Gems and other heavy objects get a 10% bonus throwing force. |
| width="16.6%" | {{Icon perk|elemental insulation}} |
| width="16.6%" | {{Icon perk|elemental insulation}} |
||
| − | + | {{passive}} '''[[Elemental Insulation]]''' <sup>II</sup> |
|
Costs {{Perk points}} 5 perk points |
Costs {{Perk points}} 5 perk points |
||
| − | Get |
+ | Get 25% resistance to all elemental damage. |
| width="16.6%" | {{Icon perk|thick soles}} |
| width="16.6%" | {{Icon perk|thick soles}} |
||
| − | + | {{active}} '''[[Hover Boots]]''' <sup>III</sup> |
|
Costs {{Perk points}} 7 perk points |
Costs {{Perk points}} 7 perk points |
||
| − | + | {{active|Active:}} Fancy boots that let you hover in midair for 3 seconds.<br> |
|
(90 seconds cooldown) |
(90 seconds cooldown) |
||
|} |
|} |
||
| − | {| class="wikitable mw-collapsible" style="text-align:center; width:100%" |
+ | {| class="wikitable mw-collapsible mw-collapsed" style="text-align:center; width:100%" |
|- |
|- |
||
! style="padding:10px;" colspan="6" | List of available <big><span style="color:#F5A432">Tier 6</span></big> perks |
! style="padding:10px;" colspan="6" | List of available <big><span style="color:#F5A432">Tier 6</span></big> perks |
||
| Line 353: | Line 353: | ||
|- style="vertical-align: top;" |
|- style="vertical-align: top;" |
||
| width="16.6%" | {{Icon perk|berzerker}} |
| width="16.6%" | {{Icon perk|berzerker}} |
||
| − | + | {{active}} '''[[Berzerker]]''' <sup>III</sup> |
|
Costs {{Perk points}} 7 perk points |
Costs {{Perk points}} 7 perk points |
||
| − | + | {{active|Active:}} Go berzerk for 10 seconds during which you get boosted melee damage and a lightning-fast pickaxe Power Attack recharge.<br> |
|
(6 minutes cooldown) |
(6 minutes cooldown) |
||
| − | | width="16.6%" | |
+ | | width="16.6%" | {{Icon perk|red sugar rocks}} |
| − | + | {{passive}} '''[[Sweet Tooth]]''' <sup>III</sup> |
|
Costs {{Perk points}} 8 perk points (15 total) |
Costs {{Perk points}} 8 perk points (15 total) |
||
| − | Getting a taste for that stuff! Get |
+ | Getting a taste for that stuff! Get 30% more healing from consuming Red Sugar!<br> |
| − | + | 20% movement speed bonus for 10 seconds after consuming Red Sugar! |
|
| width="16.6%" | {{Icon perk|resupplier}} |
| width="16.6%" | {{Icon perk|resupplier}} |
||
| − | + | {{passive}} '''[[Resupplier]]''' <sup>IV</sup> |
|
Costs {{Perk points}} 7 perk points (17 total) |
Costs {{Perk points}} 7 perk points (17 total) |
||
| − | You’re a busy dwarf, got aliens to shoot!<br>Stock up on Ammo and Health |
+ | You’re a busy dwarf, got aliens to shoot!<br>Stock up on Ammo and Health 50% faster at the Resupply Pod.<br> |
| − | Regain an extra |
+ | Regain an extra 25% health when you resupply!<br> |
After resupplying, all weapons instantly reload! |
After resupplying, all weapons instantly reload! |
||
| width="16.6%" | {{Icon perk|unstoppable}} |
| width="16.6%" | {{Icon perk|unstoppable}} |
||
| − | + | {{passive}} '''[[Unstoppable]]''' <sup>II</sup> |
|
Costs {{Perk points}} 3 perk points |
Costs {{Perk points}} 3 perk points |
||
| − | Nothing holds you back! Environmental slow-down effects are reduced by |
+ | Nothing holds you back! Environmental slow-down effects are reduced by 30%!<br> |
| − | You move |
+ | You move 15% faster while carrying heavy objects! |
| width="16.6%" | {{Icon perk|iron will}} |
| width="16.6%" | {{Icon perk|iron will}} |
||
| − | + | {{active}} '''[[Iron Will]]''' <sup>IV</sup> |
|
Costs {{Perk points}} 9 perk points (24 total) |
Costs {{Perk points}} 9 perk points (24 total) |
||
| − | + | {{active|Active:}} Never give up! Once per mission, get back into the fight with all your weapons reloaded and a rage-fueled strength for a 12 second last stand before going down for good!<br> |
|
While in this state you move faster, hit harder, and are resistant to slowdowns.<br> |
While in this state you move faster, hit harder, and are resistant to slowdowns.<br> |
||
Make it count! |
Make it count! |
||
| width="16.6%" | {{Icon perk|vampire}} |
| width="16.6%" | {{Icon perk|vampire}} |
||
| − | + | {{passive}} '''[[Vampire]]''' <sup>I</sup> |
|
Costs {{Perk points}} 2 perk points |
Costs {{Perk points}} 2 perk points |
||
| Line 398: | Line 398: | ||
|- style="vertical-align: top;" |
|- style="vertical-align: top;" |
||
| width="16.6%" | {{Icon perk|strong arm}} |
| width="16.6%" | {{Icon perk|strong arm}} |
||
| − | + | {{passive}} '''[[Strong Arm]]''' <sup>II</sup> |
|
Costs {{Perk points}} 3 perk points |
Costs {{Perk points}} 3 perk points |
||
| − | You throw flares with |
+ | You throw flares with 30% more force than the average Dwarf! Woosh!<br> |
| − | Gems and other heavy objects get a |
+ | Gems and other heavy objects get a 10% bonus throwing force. |
| width="16.6%" | {{Icon perk|elemental insulation}} |
| width="16.6%" | {{Icon perk|elemental insulation}} |
||
| − | + | {{passive}} '''[[Elemental Insulation]]''' <sup>III</sup> |
|
Costs {{Perk points}} 8 perk points (15 total) |
Costs {{Perk points}} 8 perk points (15 total) |
||
| − | Get |
+ | Get 30% resistance to all elemental damage. |
| width="16.6%" | {{Icon perk|dash}} |
| width="16.6%" | {{Icon perk|dash}} |
||
| − | + | {{active}} '''[[Dash]]''' <sup>I</sup> |
|
Costs {{Perk points}} 3 perk points |
Costs {{Perk points}} 3 perk points |
||
| − | + | {{active|Active:}} Get out of trouble with a short burst of speed.<br> |
|
| − | While dashing you ignore all slowdown effects.<br> |
+ | While dashing, you ignore all slowdown effects.<br> |
(40 seconds cooldown) |
(40 seconds cooldown) |
||
| width="16.6%" | {{Icon perk|beast master}} |
| width="16.6%" | {{Icon perk|beast master}} |
||
| − | + | {{active}} '''[[Beast Master]]''' <sup>I</sup> |
|
Costs {{Perk points}} 3 perk points |
Costs {{Perk points}} 3 perk points |
||
| − | + | {{active|Active:}} Charm a Glyphid Grunt to become your loyal companion. You can only have one tamed Grunt at a time.<br> |
|
(5 minute cooldown) |
(5 minute cooldown) |
||
| width="16.6%" | {{Icon perk|thick soles}} |
| width="16.6%" | {{Icon perk|thick soles}} |
||
| − | + | {{active}} '''[[Hover Boots]]''' <sup>IV</sup> |
|
Costs {{Perk points}} 9 perk points (24 total) |
Costs {{Perk points}} 9 perk points (24 total) |
||
| − | + | {{active|Active:}} Fancy boots that let you hover in midair for 3.5 seconds.<br> |
|
(75 seconds cooldown) |
(75 seconds cooldown) |
||
|} |
|} |
||
| − | {| class="wikitable mw-collapsible" style="text-align:center; width:100%" |
+ | {| class="wikitable mw-collapsible mw-collapsed" style="text-align:center; width:100%" |
|- |
|- |
||
! style="padding:10px;" colspan="6" | List of available <big><span style="color:#F5A432">Tier 7</span></big> perks |
! style="padding:10px;" colspan="6" | List of available <big><span style="color:#F5A432">Tier 7</span></big> perks |
||
| Line 441: | Line 441: | ||
|- style="vertical-align: top;" |
|- style="vertical-align: top;" |
||
| width="16.6%" | {{Icon perk|berzerker}} |
| width="16.6%" | {{Icon perk|berzerker}} |
||
| − | + | {{active}} '''[[Berzerker]]''' <sup>IV</sup> |
|
Costs {{Perk points}} 9 perk points (24 total) |
Costs {{Perk points}} 9 perk points (24 total) |
||
| − | + | {{active|Active:}} Go berzerk for 10 seconds during which you get boosted melee damage and a lightning-fast pickaxe Power Attack recharge.<br> |
|
(4 minutes cooldown) |
(4 minutes cooldown) |
||
| width="16.6%" | {{Icon perk|deep pockets}} |
| width="16.6%" | {{Icon perk|deep pockets}} |
||
| − | + | {{passive}} '''[[Deep Pockets]]''' <sup>I</sup> |
|
Costs {{Perk points}} 2 perk points |
Costs {{Perk points}} 2 perk points |
||
| Line 454: | Line 454: | ||
Leave nothing behind! Each of your mineral pouches hold +5 more valuables! |
Leave nothing behind! Each of your mineral pouches hold +5 more valuables! |
||
| width="16.6%" | {{Icon perk|unstoppable}} |
| width="16.6%" | {{Icon perk|unstoppable}} |
||
| − | + | {{passive}} '''[[Unstoppable]]''' <sup>III</sup> |
|
Costs {{Perk points}} 5 perk points |
Costs {{Perk points}} 5 perk points |
||
| − | Nothing holds you back! Environmental slow-down effects are reduced by |
+ | Nothing holds you back! Environmental slow-down effects are reduced by 40%!<br> |
| − | You move |
+ | You move 20% faster while carrying heavy objects! |
| width="16.6%" | {{Icon perk|vampire}} |
| width="16.6%" | {{Icon perk|vampire}} |
||
| − | + | {{passive}} '''[[Vampire]]''' <sup>II</sup> |
|
Costs {{Perk points}} 3 perk points |
Costs {{Perk points}} 3 perk points |
||
| Line 468: | Line 468: | ||
Regain 3 health when you kill a medium sized or larger creature with a melee attack! |
Regain 3 health when you kill a medium sized or larger creature with a melee attack! |
||
| width="16.6%" | {{Icon perk|strong arm}} |
| width="16.6%" | {{Icon perk|strong arm}} |
||
| − | + | {{passive}} '''[[Strong Arm]]''' <sup>III</sup> |
|
Costs {{Perk points}} 5 perk points |
Costs {{Perk points}} 5 perk points |
||
| − | You throw flares with |
+ | You throw flares with 40% more force than the average Dwarf! Woosh!<br> |
| − | Gems and other heavy objects get a |
+ | Gems and other heavy objects get a 20% bonus throwing force. |
| width="16.6%" | {{Icon perk|born ready}} |
| width="16.6%" | {{Icon perk|born ready}} |
||
| − | + | {{passive}} '''[[Born Ready]]''' <sup>I</sup> |
|
Costs {{Perk points}} 2 perk points |
Costs {{Perk points}} 2 perk points |
||
| Line 482: | Line 482: | ||
|- style="vertical-align: top;" |
|- style="vertical-align: top;" |
||
| width="16.6%" | {{Icon perk|shield link}} |
| width="16.6%" | {{Icon perk|shield link}} |
||
| − | + | {{active}} '''[[Shield Link]]''' <sup>I</sup> |
|
Costs {{Perk points}} 3 perk points |
Costs {{Perk points}} 3 perk points |
||
| − | + | {{passive|Passive:}} Whenever you are within 4m of a teammate, both of your shields recharge 50% faster!<br> |
|
| − | + | {{active|Active:}} You can overcharge a teammate’s shield to 300% for 20 seconds.<br> |
|
(3 minutes cooldown) |
(3 minutes cooldown) |
||
| width="16.6%" | {{Icon perk|dash}} |
| width="16.6%" | {{Icon perk|dash}} |
||
| − | + | {{active}} '''[[Dash]]''' <sup>II</sup> |
|
Costs {{Perk points}} 5 perk points |
Costs {{Perk points}} 5 perk points |
||
| − | + | {{active|Active:}} Get out of trouble with a short burst of speed.<br> |
|
| − | While dashing you ignore all slowdown effects.<br> |
+ | While dashing, you ignore all slowdown effects.<br> |
(35 seconds cooldown) |
(35 seconds cooldown) |
||
| width="16.6%" | {{Icon perk|beast master}} |
| width="16.6%" | {{Icon perk|beast master}} |
||
| − | + | {{active}} '''[[Beast Master]]''' <sup>II</sup> |
|
Costs {{Perk points}} 5 perk points |
Costs {{Perk points}} 5 perk points |
||
| − | + | {{active|Active:}} Charm a Glyphid Grunt to become your loyal companion. You can only have one tamed Grunt at a time.<br> |
|
(5 minute cooldown)<br> |
(5 minute cooldown)<br> |
||
| − | Tamed Grunts deal |
+ | Tamed Grunts deal 100% more damage to their targets! |
|} |
|} |
||
| − | {| class="wikitable mw-collapsible" style="text-align:center; width:100%" |
+ | {| class="wikitable mw-collapsible mw-collapsed" style="text-align:center; width:100%" |
|- |
|- |
||
! style="padding:10px;" colspan="6" | List of available <big><span style="color:#F5A432">Tier 8</span></big> perks |
! style="padding:10px;" colspan="6" | List of available <big><span style="color:#F5A432">Tier 8</span></big> perks |
||
| Line 514: | Line 514: | ||
|- style="vertical-align: top;" |
|- style="vertical-align: top;" |
||
| width="16.6%" | {{Icon perk|deep pockets}} |
| width="16.6%" | {{Icon perk|deep pockets}} |
||
| − | + | {{passive}} '''[[Deep Pockets]]''' <sup>II</sup> |
|
Costs {{Perk points}} 5 perk points |
Costs {{Perk points}} 5 perk points |
||
| Line 520: | Line 520: | ||
Leave nothing behind! Each of your mineral pouches hold +10 more valuables! |
Leave nothing behind! Each of your mineral pouches hold +10 more valuables! |
||
| width="16.6%" | {{Icon perk|unstoppable}} |
| width="16.6%" | {{Icon perk|unstoppable}} |
||
| − | + | {{passive}} '''[[Unstoppable]]''' <sup>IV</sup> |
|
Costs {{Perk points}} 7 perk points (17 total) |
Costs {{Perk points}} 7 perk points (17 total) |
||
| − | Nothing holds you back! Environmental slow-down effects are reduced by |
+ | Nothing holds you back! Environmental slow-down effects are reduced by 50%!<br> |
| − | You move |
+ | You move 25% faster while carrying heavy objects! |
| width="16.6%" | {{Icon perk|vampire}} |
| width="16.6%" | {{Icon perk|vampire}} |
||
| − | + | {{passive}} '''[[Vampire]]''' <sup>III</sup> |
|
Costs {{Perk points}} 5 perk points |
Costs {{Perk points}} 5 perk points |
||
| Line 534: | Line 534: | ||
Regain 4 health when you kill a medium sized or larger creature with a melee attack! |
Regain 4 health when you kill a medium sized or larger creature with a melee attack! |
||
| width="16.6%" | {{Icon perk|strong arm}} |
| width="16.6%" | {{Icon perk|strong arm}} |
||
| − | + | {{passive}} '''[[Strong Arm]]''' <sup>IV</sup> |
|
Costs {{Perk points}} 7 perk points (17 total) |
Costs {{Perk points}} 7 perk points (17 total) |
||
| − | You throw flares with |
+ | You throw flares with 50% more force than the average Dwarf! Woosh!<br> |
| − | Gems and other heavy objects get a |
+ | Gems and other heavy objects get a 20% bonus throwing force. |
| width="16.6%" | {{Icon perk|born ready}} |
| width="16.6%" | {{Icon perk|born ready}} |
||
| − | + | {{passive}} '''[[Born Ready]]''' <sup>II</sup> |
|
Costs {{Perk points}} 5 perk points |
Costs {{Perk points}} 5 perk points |
||
| Line 547: | Line 547: | ||
Unequipped weapons automatically reload after 10 seconds. |
Unequipped weapons automatically reload after 10 seconds. |
||
| width="16.6%" | {{Icon perk|shield link}} |
| width="16.6%" | {{Icon perk|shield link}} |
||
| − | + | {{active}} '''[[Shield Link]]''' <sup>II</sup> |
|
Costs {{Perk points}} 7 perk points |
Costs {{Perk points}} 7 perk points |
||
| − | + | {{passive|Passive:}} Whenever you are within 4m of a teammate, both of your shields recharge 50% faster!<br> |
|
| − | + | {{active|Active:}} You can overcharge a teammate’s shield to 300% for 30 seconds.<br> |
|
(3 minutes cooldown) |
(3 minutes cooldown) |
||
|- style="vertical-align: top;" |
|- style="vertical-align: top;" |
||
| width="16.6%" | {{Icon perk|dash}} |
| width="16.6%" | {{Icon perk|dash}} |
||
| − | + | {{active}} '''[[Dash]]''' <sup>III</sup> |
|
Costs {{Perk points}} 7 perk points |
Costs {{Perk points}} 7 perk points |
||
| − | + | {{active|Active:}} Get out of trouble with a short burst of speed.<br> |
|
| − | While dashing you ignore all slowdown effects.<br> |
+ | While dashing, you ignore all slowdown effects.<br> |
(30 seconds cooldown) |
(30 seconds cooldown) |
||
| width="16.6%" | {{Icon perk|bug thing}} |
| width="16.6%" | {{Icon perk|bug thing}} |
||
| − | + | {{passive}} '''[[It's a Bug Thing]]''' <sup>I</sup> |
|
Costs {{Perk points}} 2 perk points |
Costs {{Perk points}} 2 perk points |
||
| Line 570: | Line 570: | ||
For some reason, [[Loot Bug]]s explode whenever you get within 2m of them…! |
For some reason, [[Loot Bug]]s explode whenever you get within 2m of them…! |
||
| width="16.6%" | {{Icon perk|beast master}} |
| width="16.6%" | {{Icon perk|beast master}} |
||
| − | + | {{active}} '''[[Beast Master]]''' <sup>III</sup> |
|
Costs {{Perk points}} 7 perk points |
Costs {{Perk points}} 7 perk points |
||
| − | + | {{active|Active:}} Charm a Glyphid Grunt to become your loyal companion. You can only have one tamed Grunt at a time.<br> |
|
(5 minute cooldown)<br> |
(5 minute cooldown)<br> |
||
| − | Tamed Grunts deal |
+ | Tamed Grunts deal 200% more damage to their targets! |
|} |
|} |
||
| − | {| class="wikitable mw-collapsible" style="text-align:center; width:100%" |
+ | {| class="wikitable mw-collapsible mw-collapsed" style="text-align:center; width:100%" |
|- |
|- |
||
! style="padding:10px;" colspan="6" | List of available <big><span style="color:#F5A432">Tier 9</span></big> perks |
! style="padding:10px;" colspan="6" | List of available <big><span style="color:#F5A432">Tier 9</span></big> perks |
||
| Line 586: | Line 586: | ||
|- style="vertical-align: top;" |
|- style="vertical-align: top;" |
||
| width="16.6%" | {{Icon perk|deep pockets}} |
| width="16.6%" | {{Icon perk|deep pockets}} |
||
| − | + | {{passive}} '''[[Deep Pockets]]''' <sup>III</sup> |
|
Costs {{Perk points}} 8 perk points (15 total) |
Costs {{Perk points}} 8 perk points (15 total) |
||
| Line 592: | Line 592: | ||
Leave nothing behind! Each of your mineral pouches hold +15 more valuables! |
Leave nothing behind! Each of your mineral pouches hold +15 more valuables! |
||
| width="16.6%" | {{Icon perk|vampire}} |
| width="16.6%" | {{Icon perk|vampire}} |
||
| − | + | {{passive}} '''[[Vampire]]''' <sup>IV</sup> |
|
Costs {{Perk points}} 7 perk points (17 total) |
Costs {{Perk points}} 7 perk points (17 total) |
||
| Line 599: | Line 599: | ||
Regain 5 health when you kill a medium sized or larger creature with a melee attack! |
Regain 5 health when you kill a medium sized or larger creature with a melee attack! |
||
| width="16.6%" | {{Icon perk|born ready}} |
| width="16.6%" | {{Icon perk|born ready}} |
||
| − | + | {{passive}} '''[[Born Ready]]''' <sup>III</sup> |
|
Costs {{Perk points}} 8 perk points (15 total) |
Costs {{Perk points}} 8 perk points (15 total) |
||
| Line 605: | Line 605: | ||
Unequipped weapons automatically reload after 5 seconds. |
Unequipped weapons automatically reload after 5 seconds. |
||
| width="16.6%" | {{Icon perk|shield link}} |
| width="16.6%" | {{Icon perk|shield link}} |
||
| − | + | {{active}} '''[[Shield Link]]''' <sup>III</sup> |
|
Costs {{Perk points}} 11 perk points (21 total) |
Costs {{Perk points}} 11 perk points (21 total) |
||
| − | + | {{passive|Passive:}} Whenever you are within 4m of a teammate, both of your shields recharge 50% faster!<br> |
|
| − | + | {{active|Active:}} You can overcharge a teammate’s shield to 300% for 30 seconds.<br> |
|
(2 minutes cooldown) |
(2 minutes cooldown) |
||
| width="16.6%" | {{Icon perk|dash}} |
| width="16.6%" | {{Icon perk|dash}} |
||
| − | + | {{active}} '''[[Dash]]''' <sup>IV</sup> |
|
Costs {{Perk points}} 9 perk points (24 total) |
Costs {{Perk points}} 9 perk points (24 total) |
||
| − | + | {{active|Active:}} Get out of trouble with a short burst of speed.<br> |
|
| − | While dashing you ignore all slowdown effects.<br> |
+ | While dashing, you ignore all slowdown effects.<br> |
(25 seconds cooldown) |
(25 seconds cooldown) |
||
| width="16.6%" | {{Icon perk|bug thing}} |
| width="16.6%" | {{Icon perk|bug thing}} |
||
| − | + | {{passive}} '''[[It's a Bug Thing]]''' <sup>II</sup> |
|
Costs {{Perk points}} 3 perk points (5 total) |
Costs {{Perk points}} 3 perk points (5 total) |
||
| Line 628: | Line 628: | ||
|- style="vertical-align: top;" |
|- style="vertical-align: top;" |
||
| width="16.6%" | {{Icon perk|beast master}} |
| width="16.6%" | {{Icon perk|beast master}} |
||
| − | + | {{active}} '''[[Beast Master]]''' <sup>IV</sup> |
|
Costs {{Perk points}} 9 perk points (24 total) |
Costs {{Perk points}} 9 perk points (24 total) |
||
| − | + | {{active|Active:}} Charm a Glyphid Grunt to become your loyal companion. You can only have one tamed Grunt at a time.<br> |
|
(5 minute cooldown)<br> |
(5 minute cooldown)<br> |
||
| − | Tamed Grunts deal |
+ | Tamed Grunts deal 300% more damage to their targets! |
| width="16.6%" | {{Icon perk|more perks}} |
| width="16.6%" | {{Icon perk|more perks}} |
||
| − | + | {{passive}} '''[[New Passive Perk Slot]]''' <sup>II</sup> |
|
Costs {{Perk points}} 20 perk points (35 total) |
Costs {{Perk points}} 20 perk points (35 total) |
||
| Line 673: | Line 673: | ||
|- |
|- |
||
|style="background-color:rgba(0,0,0,0.5);"|'''Complete Egg Hunts''' |
|style="background-color:rgba(0,0,0,0.5);"|'''Complete Egg Hunts''' |
||
| − | | rowspan=" |
+ | | rowspan="7" style="text-align:center;"|Complete '''2/4/6/8/10'''<br/>missions of specified type |
| − | |rowspan=" |
+ | |rowspan="48" style="text-align:center;"|{{perk points}} '''2'''<br/>perk points |
|- |
|- |
||
|style="background-color:rgba(0,0,0,0.5);"|'''Complete Eliminations''' |
|style="background-color:rgba(0,0,0,0.5);"|'''Complete Eliminations''' |
||
| Line 683: | Line 683: | ||
|- |
|- |
||
|style="background-color:rgba(0,0,0,0.5);"|'''Complete Salvage Operations''' |
|style="background-color:rgba(0,0,0,0.5);"|'''Complete Salvage Operations''' |
||
| + | |- |
||
| + | |style="background-color:rgba(0,0,0,0.5);"|'''Complete Escort Duties''' |
||
| + | |- |
||
| + | |style="background-color:rgba(0,0,0,0.5);"|'''Complete On-Site Refinings''' |
||
|- |
|- |
||
|style="background-color:rgba(0,0,0,0.5);"|'''Complete Hazard 3 or Higher Missions''' |
|style="background-color:rgba(0,0,0,0.5);"|'''Complete Hazard 3 or Higher Missions''' |
||
| Line 688: | Line 692: | ||
|- |
|- |
||
|style="background-color:rgba(0,0,0,0.5);"|'''Complete Hazard 5 Missions''' |
|style="background-color:rgba(0,0,0,0.5);"|'''Complete Hazard 5 Missions''' |
||
| − | |style="text-align:center;"|Complete '''1/2/3/5/7'''<br/>missions on Hazard 5 |
+ | |style="text-align:center;"|Complete '''1/2/3/5/7'''<br/>missions on Hazard 5 |
|- |
|- |
||
|style="background-color:rgba(0,0,0,0.5);"|'''Complete Collect Apoca Bloom Objectives''' |
|style="background-color:rgba(0,0,0,0.5);"|'''Complete Collect Apoca Bloom Objectives''' |
||
| − | | rowspan=" |
+ | | rowspan="8" style="text-align:center; border-bottom-width:3px;"|Complete '''2/4/6/8/10'''<br/>secondary objectives<br/>of specified type (2/3/4/5/6 dystrum) |
|- |
|- |
||
|style="background-color:rgba(0,0,0,0.5);"|'''Complete Collect Boolo Cap Objectives''' |
|style="background-color:rgba(0,0,0,0.5);"|'''Complete Collect Boolo Cap Objectives''' |
||
|- |
|- |
||
|style="background-color:rgba(0,0,0,0.5);"|'''Complete Collect Dystrum Objectives''' |
|style="background-color:rgba(0,0,0,0.5);"|'''Complete Collect Dystrum Objectives''' |
||
| + | |- |
||
| + | |style="background-color:rgba(0,0,0,0.5);"|'''Complete Collect Ebonut Objectives''' |
||
| + | |- |
||
| + | |style="background-color:rgba(0,0,0,0.5);"|'''Complete Eliminate Fester Fleas Objectives''' |
||
|- |
|- |
||
|style="background-color:rgba(0,0,0,0.5);"|'''Complete Collect Fossil Objectives''' |
|style="background-color:rgba(0,0,0,0.5);"|'''Complete Collect Fossil Objectives''' |
||
| + | |- |
||
| + | |style="background-color:rgba(0,0,0,0.5);"|'''Complete Collect Gunk Seed Objectives''' |
||
|- |
|- |
||
|style="background-color:rgba(0,0,0,0.5); border-bottom-width:3px;"|'''Complete Collect Hollomite Objectives''' |
|style="background-color:rgba(0,0,0,0.5); border-bottom-width:3px;"|'''Complete Collect Hollomite Objectives''' |
||
|- |
|- |
||
|style="background-color:rgba(0,0,0,0.5);"|'''Complete Missions in Crystalline Caverns''' |
|style="background-color:rgba(0,0,0,0.5);"|'''Complete Missions in Crystalline Caverns''' |
||
| − | | rowspan=" |
+ | | rowspan="10" style="text-align:center; border-bottom-width:3px;"|Complete '''2/3/4/5/6'''<br/>missions in specified biome |
|- |
|- |
||
|style="background-color:rgba(0,0,0,0.5);"|'''Complete Missions in Dense Biozone''' |
|style="background-color:rgba(0,0,0,0.5);"|'''Complete Missions in Dense Biozone''' |
||
| Line 716: | Line 726: | ||
|style="background-color:rgba(0,0,0,0.5);"|'''Complete Missions in Sandblasted Corridors''' |
|style="background-color:rgba(0,0,0,0.5);"|'''Complete Missions in Sandblasted Corridors''' |
||
|- |
|- |
||
| − | |style="background-color:rgba(0,0,0,0.5) |
+ | |style="background-color:rgba(0,0,0,0.5);"|'''Complete Missions in The Salt Pits''' |
| + | |- |
||
| + | |style="background-color:rgba(0,0,0,0.5);"|'''Complete Missions in Azure Weald''' |
||
| + | |- |
||
| + | |style="background-color:rgba(0,0,0,0.5); border-bottom-width:3px;"|'''Complete Missions in Hollow Bough''' |
||
|- |
|- |
||
|style="background-color:rgba(0,0,0,0.5);"|'''Complete 'Cave Leech Cluster' Warnings''' |
|style="background-color:rgba(0,0,0,0.5);"|'''Complete 'Cave Leech Cluster' Warnings''' |
||
| − | | rowspan=" |
+ | | rowspan="11" style="text-align:center; border-bottom-width:3px;"|Complete '''1/2/3/4/5'''<br/>missions with the specified mutator |
|- |
|- |
||
|style="background-color:rgba(0,0,0,0.5);"|'''Complete 'Exploder Infestation' Warnings''' |
|style="background-color:rgba(0,0,0,0.5);"|'''Complete 'Exploder Infestation' Warnings''' |
||
| Line 735: | Line 749: | ||
|style="background-color:rgba(0,0,0,0.5);"|'''Complete 'Regenerative Bugs' Warnings''' |
|style="background-color:rgba(0,0,0,0.5);"|'''Complete 'Regenerative Bugs' Warnings''' |
||
|- |
|- |
||
| − | |style="background-color:rgba(0,0,0,0.5) |
+ | |style="background-color:rgba(0,0,0,0.5);"|'''Complete 'Shield Disruption' Warnings''' |
| + | |- |
||
| + | |style="background-color:rgba(0,0,0,0.5);"|'''Complete 'Swarmageddon' Warnings''' |
||
| + | |- |
||
| + | |style="background-color:rgba(0,0,0,0.5); border-bottom-width:3px;"|'''Complete 'Elite Threat' Warnings''' |
||
|- |
|- |
||
|style="background-color:rgba(0,0,0,0.5);"|'''Purchase Accessory Items''' |
|style="background-color:rgba(0,0,0,0.5);"|'''Purchase Accessory Items''' |
||
| Line 768: | Line 786: | ||
|} |
|} |
||
| − | + | ==== Milestone Icons ==== |
|
| − | File:MisTypeComp_Tutorial.png|Complete the Tutorial Mission |
||
| ⚫ | |||
| ⚫ | |||
| ⚫ | |||
| ⚫ | |||
| − | |||
| ⚫ | |||
| ⚫ | |||
| ⚫ | |||
| ⚫ | |||
| ⚫ | |||
| − | |||
| ⚫ | |||
| ⚫ | |||
| ⚫ | |||
| ⚫ | |||
| ⚫ | |||
| − | |||
| ⚫ | |||
| ⚫ | |||
| ⚫ | |||
| ⚫ | |||
| ⚫ | |||
| − | |||
| ⚫ | |||
| ⚫ | |||
| ⚫ | |||
| ⚫ | |||
| ⚫ | |||
| − | |||
| ⚫ | |||
| ⚫ | |||
| ⚫ | |||
| ⚫ | |||
| ⚫ | |||
| − | |||
| ⚫ | |||
| ⚫ | |||
| ⚫ | |||
| ⚫ | |||
| ⚫ | |||
| − | |||
| ⚫ | |||
| ⚫ | |||
| ⚫ | |||
| ⚫ | |||
| ⚫ | |||
| − | |||
| ⚫ | |||
| ⚫ | |||
| ⚫ | |||
| ⚫ | |||
| ⚫ | |||
| + | <div style="text-align:center;"> |
||
| + | <gallery mode="inline" widths="220px" perrow="6"> |
||
| ⚫ | |||
| ⚫ | |||
| ⚫ | |||
| ⚫ | |||
| ⚫ | |||
| ⚫ | |||
| ⚫ | |||
| ⚫ | |||
| ⚫ | |||
| ⚫ | |||
| ⚫ | |||
| + | File:MisTypeComp Escort.png|Complete Escort Duties |
||
| + | File:MisTypeComp Refinery.png|Complete On-Site Refinings |
||
| ⚫ | |||
| ⚫ | |||
| ⚫ | |||
| ⚫ | |||
| + | File:SecMisComp Ebonut.png|Complete Collect Ebonut Objectives |
||
| ⚫ | |||
| + | File:SecMisComp Gunk Seeds.png|Complete Collect Gunk Seed Objectives |
||
| ⚫ | |||
| ⚫ | |||
| ⚫ | |||
| ⚫ | |||
| ⚫ | |||
| ⚫ | |||
| + | File:MisBiomeComp Hollowbough.png|Complete Missions in Hollow Bough |
||
| + | File:MisBiomeComp AzureWeald.png|Complete Missions in Azure Weald |
||
| ⚫ | |||
| ⚫ | |||
| ⚫ | |||
| ⚫ | |||
| ⚫ | |||
| ⚫ | |||
| ⚫ | |||
| ⚫ | |||
| + | File:Warning Complete Swarmageddon.png|Complete 'Swarmageddon' Warnings |
||
| + | File:Warning Complete Elite Threat.png|Complete 'Elite Threat' Warnings |
||
| ⚫ | |||
| ⚫ | |||
| ⚫ | |||
| ⚫ | |||
| ⚫ | |||
| ⚫ | |||
| ⚫ | |||
| ⚫ | |||
| ⚫ | |||
| ⚫ | |||
| + | File:SecMisComp Festerflea.png|Complete Eliminate Fester Fleas Objectives |
||
| ⚫ | |||
| ⚫ | |||
| ⚫ | |||
| ⚫ | |||
</gallery> |
</gallery> |
||
| + | </div> |
||
=== Trivia === |
=== Trivia === |
||
| − | * As of [[Update |
+ | * As of [[Update 33: New Frontiers]], it costs '''437''' {{Perk points}}Perk Points to unlock everything and '''570''' {{Perk points}}Perk Points are available from Milestones, leaving '''133''' unused. |
| − | ** Before the Rebalance of the [[Update_28:_Feeling_Perky#Hotfix_4|Hotfix 4]] the total perks cost was '''547''' {{Perk points}}Perk Points, resulting |
+ | ** Before the Rebalance of the [[Update_28:_Feeling_Perky#Hotfix_4|Hotfix 4 (Update 28)]] the total perks cost was '''547''' {{Perk points}}Perk Points, resulting in a total reduction of 22%. |
=== See Also === |
=== See Also === |
||
* [[Equipment]] |
* [[Equipment]] |
||
| − | * [[Space Rig |
+ | * [[Space Rig|Terminals]] |
| − | |||
{{Mechanics nav}} |
{{Mechanics nav}} |
||
[[Category:Perks]] |
[[Category:Perks]] |
||
| + | [[es:Aptitudes]] |
||
Revision as of 12:07, 22 April 2021
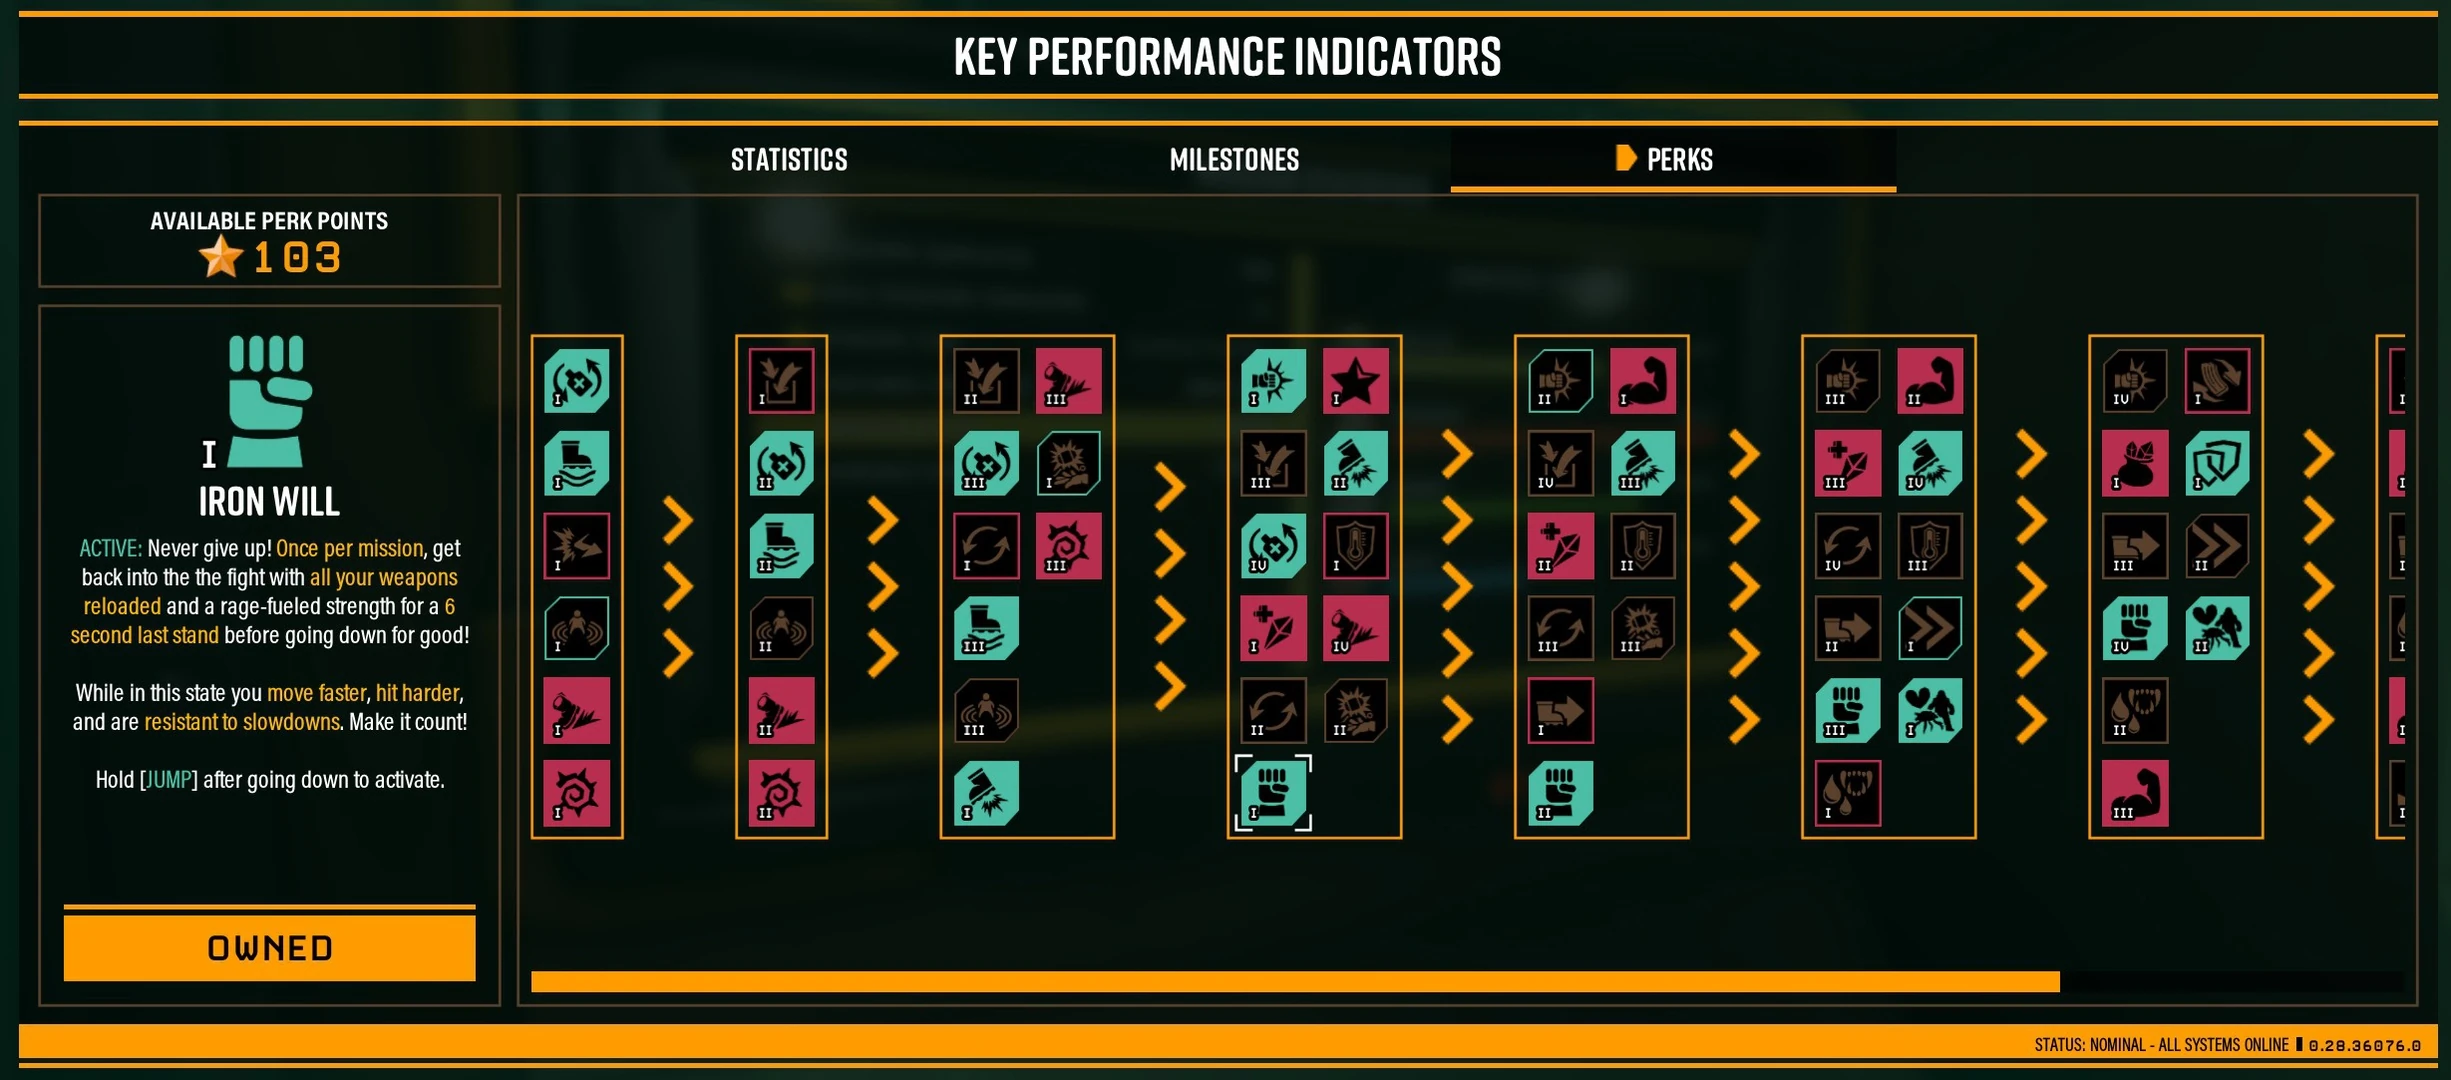

Perks unlocking at the Key Performance Indicator
Perks
Perks are optional bonuses and abilities the player may equip on a Dwarf. Perks were implemented in Update 14: Feature Creep as a major new feature and reworked with Update 28: Feeling Perky. They are purchased using Perk Points ![]() which are awarded by completing Milestones. Once a milestone has been completed, the Perk Point reward can be claimed at your Key Performance Indicator terminal in the Space Rig. They offer small boosts to certain stats or give certain abilities, such as increasing the amount of minerals a Dwarf can hold in their pouch, or allowing a Dwarf to revive someone instantly once per mission. Once unlocked, all classes can equip a perk. Players start with one Active and one Passive Perk Slot. Active perks are activated as abilities by the player using a button, while passive perks are always active and always give a bonus. Some active perks also have a passive effect which does not need to be activated. An additional Active Slot is unlocked after Promoting each dwarf, and two extra Passive Slots can be unlocked for all dwarfs at perk Tier 4 and Tier 9. A list of perks and their functions can be found just below.
which are awarded by completing Milestones. Once a milestone has been completed, the Perk Point reward can be claimed at your Key Performance Indicator terminal in the Space Rig. They offer small boosts to certain stats or give certain abilities, such as increasing the amount of minerals a Dwarf can hold in their pouch, or allowing a Dwarf to revive someone instantly once per mission. Once unlocked, all classes can equip a perk. Players start with one Active and one Passive Perk Slot. Active perks are activated as abilities by the player using a button, while passive perks are always active and always give a bonus. Some active perks also have a passive effect which does not need to be activated. An additional Active Slot is unlocked after Promoting each dwarf, and two extra Passive Slots can be unlocked for all dwarfs at perk Tier 4 and Tier 9. A list of perks and their functions can be found just below.
Milestones
Perks are purchased using Perk Points ![]() , which can be acquired by completing Milestones. Milestones may include completing missions in certain biomes, completing missions with certain mutators, gaining levels with a class, or unlocking a certain number of accessories. Milestones and milestone progress can be checked at your Key Performance Indicator terminal. Milestones have levels, typically from 1 to 5, with each level awarding perk points upon completion. For example, completing the 'Complete 1 Deep Dive' milestone will award points, and also unlock the 'Complete 3 Deep Dives' milestone, which will require the player to complete three additional deep dives. Milestones are not dwarf specific, and each class shares completed milestones and milestone progress.
, which can be acquired by completing Milestones. Milestones may include completing missions in certain biomes, completing missions with certain mutators, gaining levels with a class, or unlocking a certain number of accessories. Milestones and milestone progress can be checked at your Key Performance Indicator terminal. Milestones have levels, typically from 1 to 5, with each level awarding perk points upon completion. For example, completing the 'Complete 1 Deep Dive' milestone will award points, and also unlock the 'Complete 3 Deep Dives' milestone, which will require the player to complete three additional deep dives. Milestones are not dwarf specific, and each class shares completed milestones and milestone progress.
Perk Tiers
Perks are divided into tiers. To progress to the the next tier of perks, you must buy a set amount of perks from the previous tiers. For example, to unlock tier 3 perks you must buy three tier 2 or tier 1 perks. Additional passive perk slots are available for purchase at tier 4 and at tier 9. Higher tiers may also contain higher levels of perks. The previous perk level must be purchased before you may buy the next level, even if you have access to that level's tier.
| ||||||||
| List of available Tier 1 perks | |||||
|---|---|---|---|---|---|
Costs Passive: Leave no dwarf behind! You revive teammates 15% faster! |
Friendly I Costs Through the power of friendship you both take and deal 50% less damage from friendly fire! |
Costs Passive: You get an early warning when a creature is about to grab you. |
Costs Get a 8% sprint speed boost. |
Costs Passive: Right after an enemy hits you with a melee attack you get a temporary melee damage bonus. |
Thorns I Costs Any time an enemy hits you with a melee attack it will itself take 6 damage. |
| List of available Tier 2 perks | |||||
|---|---|---|---|---|---|
| Three perks required from previous Tiers to unlock. | |||||
Costs Expert bucket handling! You now deposit valuables into the MULE and Drop Pod 20% faster! |
Field Medic II Costs Passive: Leave no dwarf behind! You revive teammates 20% faster! |
Costs Passive: You get an early warning when a creature is about to grab you. |
Second Wind II Costs Get a 8% sprint speed boost. |
Costs Passive: Right after an enemy hits you with a melee attack you get a temporary melee damage bonus. |
Thorns II Costs Any time an enemy hits you with a melee attack it will itself take 12 damage. |
| List of available Tier 3 perks | |||||
|---|---|---|---|---|---|
| Three perks required from previous Tiers to unlock. | |||||
Costs Expert bucket handling! You now deposit valuables into the MULE and Drop Pod 30% faster! |
Field Medic III Costs Passive: Leave no dwarf behind! You revive teammates 25% faster! |
Costs You’re a busy dwarf, got aliens to shoot! |
Costs Active: Never give up! Once per mission, get back into the fight with all your weapons reloaded and a rage-fueled strength for a 6 second last stand before going down for good! |
Costs Passive: You get an early warning when a creature is about to grab you. |
Second Wind III Costs Get a 12% sprint speed boost. |
See You In Hell III Costs Passive: Right after an enemy hits you with a melee attack you get a temporary melee damage bonus. |
Thorns III Costs Any time an enemy hits you with a melee attack it will itself take 18 damage. |
Costs Active: Fancy boots that let you hover in midair for 2 seconds. | |||
| List of available Tier 4 perks | |||||
|---|---|---|---|---|---|
| Four perks required from previous Tiers to unlock. | |||||
Costs Active: Go berzerk for 10 seconds during which you get boosted melee damage and a lightning-fast pickaxe Power Attack recharge. |
Costs Expert bucket handling! You now deposit valuables into the MULE and Drop Pod 40% faster! |
Field Medic IV Costs Passive: Leave no dwarf behind! You revive teammates 30% faster! |
Costs Getting a taste for that stuff! Get 10% more healing from consuming Red Sugar! |
Resupplier II Costs You’re a busy dwarf, got aliens to shoot! |
Iron Will II Costs Active: Never give up! Once per mission, get back into the fight with all your weapons reloaded and a rage-fueled strength for a 8 second last stand before going down for good! |
Costs Get 20% resistance to all elemental damage. |
Second Wind IV Costs Get a 12% sprint speed boost. |
Thorns IV Costs Any time an enemy hits you with a melee attack it will itself take 24 damage. |
Costs Moving on up! Equip up to 2 passive perks at a time! |
Hover Boots II Costs Active: Fancy boots that let you hover in midair for 2.5 seconds. | |
| List of available Tier 5 perks | |||||
|---|---|---|---|---|---|
| Five perks required from previous Tiers to unlock. | |||||
Berzerker II Costs Active: Go berzerk for 10 seconds during which you get boosted melee damage and a lightning-fast pickaxe Power Attack recharge. |
Costs Expert bucket handling! You now deposit valuables into the MULE and Drop Pod 50% faster! |
Sweet Tooth II Costs Getting a taste for that stuff! Get 20% more healing from consuming Red Sugar! |
Resupplier III Costs You’re a busy dwarf, got aliens to shoot! |
Costs Nothing holds you back! Environmental slow-down effects are reduced by 20%! |
Iron Will III Costs Active: Never give up! Once per mission, get back into the fight with all your weapons reloaded and a rage-fueled strength for a 10 second last stand before going down for good! |
Costs You throw flares with 20% more force than the average Dwarf! Woosh! |
Costs Get 25% resistance to all elemental damage. |
Hover Boots III Costs Active: Fancy boots that let you hover in midair for 3 seconds. | |||
| List of available Tier 6 perks | |||||
|---|---|---|---|---|---|
| Five perks required from previous Tiers to unlock. | |||||
Berzerker III Costs Active: Go berzerk for 10 seconds during which you get boosted melee damage and a lightning-fast pickaxe Power Attack recharge. |
Sweet Tooth III Costs Getting a taste for that stuff! Get 30% more healing from consuming Red Sugar! |
Resupplier IV Costs You’re a busy dwarf, got aliens to shoot! |
Unstoppable II Costs Nothing holds you back! Environmental slow-down effects are reduced by 30%! |
Iron Will IV Costs Active: Never give up! Once per mission, get back into the fight with all your weapons reloaded and a rage-fueled strength for a 12 second last stand before going down for good! |
Vampire I Costs Good thing you work underground! |
Strong Arm II Costs You throw flares with 30% more force than the average Dwarf! Woosh! |
Costs Get 30% resistance to all elemental damage. |
Dash I Costs Active: Get out of trouble with a short burst of speed. |
Costs Active: Charm a Glyphid Grunt to become your loyal companion. You can only have one tamed Grunt at a time. |
Hover Boots IV Costs Active: Fancy boots that let you hover in midair for 3.5 seconds. | |
| List of available Tier 7 perks | |||||
|---|---|---|---|---|---|
| Five perks required from previous Tiers to unlock. | |||||
Berzerker IV Costs Active: Go berzerk for 10 seconds during which you get boosted melee damage and a lightning-fast pickaxe Power Attack recharge. |
Costs Leave nothing behind! Each of your mineral pouches hold +5 more valuables! |
Unstoppable III Costs Nothing holds you back! Environmental slow-down effects are reduced by 40%! |
Vampire II Costs Good thing you work underground! |
Strong Arm III Costs You throw flares with 40% more force than the average Dwarf! Woosh! |
Costs Unequipped weapons automatically reload after 15 seconds. |
Costs Passive: Whenever you are within 4m of a teammate, both of your shields recharge 50% faster! |
Dash II Costs Active: Get out of trouble with a short burst of speed. |
Beast Master II Costs Active: Charm a Glyphid Grunt to become your loyal companion. You can only have one tamed Grunt at a time. | |||
| List of available Tier 8 perks | |||||
|---|---|---|---|---|---|
| Five perks required from previous Tiers to unlock. | |||||
Deep Pockets II Costs Leave nothing behind! Each of your mineral pouches hold +10 more valuables! |
Unstoppable IV Costs Nothing holds you back! Environmental slow-down effects are reduced by 50%! |
Vampire III Costs Good thing you work underground! |
Strong Arm IV Costs You throw flares with 50% more force than the average Dwarf! Woosh! |
Born Ready II Costs Unequipped weapons automatically reload after 10 seconds. |
Shield Link II Costs Passive: Whenever you are within 4m of a teammate, both of your shields recharge 50% faster! |
Dash III Costs Active: Get out of trouble with a short burst of speed. |
Costs For some reason, Loot Bugs explode whenever you get within 2m of them…! |
Beast Master III Costs Active: Charm a Glyphid Grunt to become your loyal companion. You can only have one tamed Grunt at a time. | |||
| List of available Tier 9 perks | |||||
|---|---|---|---|---|---|
| Five perks required from previous Tiers to unlock. | |||||
Deep Pockets III Costs Leave nothing behind! Each of your mineral pouches hold +15 more valuables! |
Vampire IV Costs Good thing you work underground! |
Born Ready III Costs Unequipped weapons automatically reload after 5 seconds. |
Shield Link III Costs Passive: Whenever you are within 4m of a teammate, both of your shields recharge 50% faster! |
Dash IV Costs Active: Get out of trouble with a short burst of speed. |
Costs For some reason, Loot Bugs explode whenever you get within 5m of them…! |
Beast Master IV Costs Active: Charm a Glyphid Grunt to become your loyal companion. You can only have one tamed Grunt at a time. |
Costs Moving on up! Equip up to 3 passive perks at a time! | ||||
Milestones
Each milestone rewards the player with perk points; some milestones can only be claimed once. All milestones that can be claimed more than once will have their requirement increase each time it is claimed. The perk point reward amount remains constant. After completing the final requirement tier of a milestone, it will no longer appear in the milestones window. Total progress will still be tracked, and can be found on the statistics window.
Milestone progress is not cumulative. After claiming a completed milestone, your progress starts from zero.
| Milestone | Requirements | Reward |
|---|---|---|
| Gain levels as the Driller | Gain 4/5/5/5 levels |
perk points |
| Gain levels as the Engineer | ||
| Gain levels as the Gunner | ||
| Gain levels as the Scout | ||
| Complete Missions | Complete 10/15/20/25/30 missions |
perk points |
| Complete Secondary Objectives | Complete 10/12/14/16/20 secondary objectives | |
| Complete Egg Hunts | Complete 2/4/6/8/10 missions of specified type |
perk points |
| Complete Eliminations | ||
| Complete Mining Expeditions | ||
| Complete Point Extractions | ||
| Complete Salvage Operations | ||
| Complete Escort Duties | ||
| Complete On-Site Refinings | ||
| Complete Hazard 3 or Higher Missions | Complete 2/3/5/10/15 missions on specified difficulty or above | |
| Complete Hazard 5 Missions | Complete 1/2/3/5/7 missions on Hazard 5 | |
| Complete Collect Apoca Bloom Objectives | Complete 2/4/6/8/10 secondary objectives of specified type (2/3/4/5/6 dystrum) | |
| Complete Collect Boolo Cap Objectives | ||
| Complete Collect Dystrum Objectives | ||
| Complete Collect Ebonut Objectives | ||
| Complete Eliminate Fester Fleas Objectives | ||
| Complete Collect Fossil Objectives | ||
| Complete Collect Gunk Seed Objectives | ||
| Complete Collect Hollomite Objectives | ||
| Complete Missions in Crystalline Caverns | Complete 2/3/4/5/6 missions in specified biome | |
| Complete Missions in Dense Biozone | ||
| Complete Missions in Fungus Bogs | ||
| Complete Missions in Glacial Strata | ||
| Complete Missions in Magma Core | ||
| Complete Missions in Radioactive Exclusion Zone | ||
| Complete Missions in Sandblasted Corridors | ||
| Complete Missions in The Salt Pits | ||
| Complete Missions in Azure Weald | ||
| Complete Missions in Hollow Bough | ||
| Complete 'Cave Leech Cluster' Warnings | Complete 1/2/3/4/5 missions with the specified mutator | |
| Complete 'Exploder Infestation' Warnings | ||
| Complete 'Haunted Cave' Warnings | ||
| Complete 'Lethal Enemies' Warnings | ||
| Complete 'Low Oxygen' Warnings | ||
| Complete 'Mactera Plague' Warnings | ||
| Complete 'Parasites' Warnings | ||
| Complete 'Regenerative Bugs' Warnings | ||
| Complete 'Shield Disruption' Warnings | ||
| Complete 'Swarmageddon' Warnings | ||
| Complete 'Elite Threat' Warnings | ||
| Purchase Accessory Items | Purchase 5/10/15/20/25 | |
| Purchase Equipment Upgrades | Purchase 5/10/25/50/75 | |
| Complete Weapon License Assignments | Complete 1/3/4 of specified assignment | |
| Complete Deep Dives | Complete 2/3/5 Deep Dives | |
| Complete Elite Deep Dives | Complete 2/2/3 Elite Deep Dives | |
| Reach Crafting Mastery Level | Reach Crafting Mastery Level 6/11/16/21/26 | |
| Forge Weapon Overclocks | Forge 4/8/12/16/20 | |
| Forge Equipment Skins | Forge 2/5/8 | |
| Forge Cosmetic Items | Forge2/4/6/8/10 | |
| Unlock Special Beers | Unlock Special Beers 3/3/6 |
Milestone Icons

Gain 5 levels as the DRILLER

Gain 5 levels as the ENGINEER

Gain 5 levels as the GUNNER

Gain 5 levels as the SCOUT
Complete Missions
Complete Secondary Objectives
Complete Egg Hunts
Complete Eliminations
Complete Mining Expeditions
Complete Point Extractions
Complete Salvage Operations
Complete Escort Duties
Complete On-Site Refinings
Complete Hazard 3 or Higher Missions
Complete Hazard 5 Missions
Complete Collect Boolo Cap Objectives
Complete Collect Dystrum Objectives
Complete Collect Ebonut Objectives
Complete Collect Fossil Objectives
Complete Collect Gunk Seed Objectives
Complete Collect Hollomite Objectives
Complete Missions in Dense Biozone
Complete Missions in Fungus Bogs
Complete Missions in Glacial Strata
Complete Missions in Magma Core
Complete Missions in The Salt Pits
Complete Missions in Hollow Bough
Complete Missions in Azure Weald
Complete 'Cave Leech Cluster' Warnings
Complete 'Haunted Cave' Warnings
Complete 'Lethal Enemies' Warnings
Complete 'Low Oxygen' Warnings
Complete 'Mactera Plague' Warnings
Complete 'Parasites' Warnings
Complete 'Regenerative Bugs' Warnings
Complete 'No Shield' Warnings
Complete 'Swarmageddon' Warnings
Complete 'Elite Threat' Warnings
Purchase Accessory Items
Purchase Equipment Upgrades
Complete Weapon License Assignments
Complete Deep Dives
Complete Elite Deep Dives
Reach Crafting Mastery Level
Forge Cosmetic Items
Forge Equipment Skins
Forge Weapon Overclocks
Complete Collect Apoca Bloom Objectives
Complete Eliminate Fester Fleas Objectives
Complete 'Exploder Infestation' Warnings
Complete Missions in Crystalline Caverns
Complete Missions in Radioactive Exclusion Zone
Complete Missions in Sandblasted Corridors


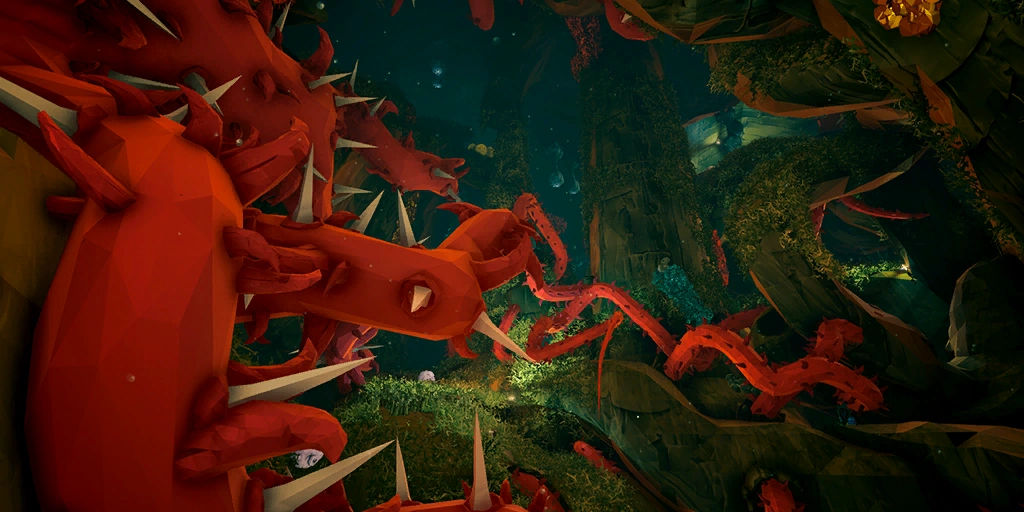


Trivia
- As of Update 33: New Frontiers, it costs 437 Perk Points to unlock everything and 570 Perk Points are available from Milestones, leaving 133 unused.
- Before the Rebalance of the Hotfix 4 (Update 28) the total perks cost was 547 Perk Points, resulting in a total reduction of 22%.
- Before the Rebalance of the Hotfix 4 (Update 28) the total perks cost was 547
See Also
| |||||||||||