Mutators were released in Update 15: Mutation Warning. Missions may have Mutators, which are special events that may modify the mission for better or worse. Warnings are negative mutators and Anomalies are positive or neutral mutators. A mission currently can have at most one Warning and one Anomaly. Warnings will increase the Hazard Bonus from 15% up to 30%, depending on the type.
Warnings
![]()
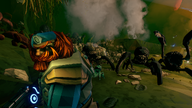
 Cave Leech Cluster
| "Watch out for the ceiling, there is an unusual density of Cave Leeches." +15% Hazard Bonus |
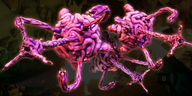
Cave Leeches spawn in much higher numbers and, as the name suggests, they are usually packed together. Sometimes they can form in a 2x2 grid, potentially wiping out an entire team if all Dwarves are ensnared simultaneously without an alternate means of escape (such as the Heightened Senses perk).
Watch ceilings closely and use the Scout's Flare Gun to light large open spaces. The Engineer's LMG Gun Platform in combination with the Hawkeye mod can do a decent job at finding and eliminating Cave Leeches from a distance.
Solo players can be freed by Bosco when grabbed, but this by no means guarantees survival; it can take a while for the drone to find its way back to its owner and kill the Leech before it is too late.
 Exploder Infestation!
| "You will be attacked by an almost constant flow of Glyphid Exploder packs." +30% Hazard Bonus |
Every so often, a pack of Glyphid Exploders will rush the Dwarves. The rushes are conducted independently of enemy spawn rates and Swarms; the special Exploders have a slightly different look to them. There has been a long-perpetrated myth that Bulk Detonators also have an increased chance to appear in these missions, but it is just that: a myth.
When the sound of creatures unburrowing themselves is heard -- followed by silence -- this usually indicates that a pack of roving Exploders has just spawned. Compared to most creatures in the depths of Hoxxes IV, they're unusually stealthy (other than a hissing sound before they explode) and can easily sneak up on unwary Dwarves.
Engineers can deploy their LMG Gun Platforms to provide cover, while solo players can generally rely on Bosco to alert them to the presence of encroaching Exploders.
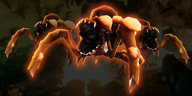
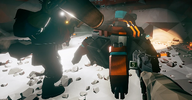
Haunted Cave
| "A slow, but invulnerable and deadly creature has been detected in this area. It will relentlessly chase you, throughout the mission. Do not let it get close." +30% Hazard Bonus |

The ghost of an angry Bulk Detonator, known as the "Unknown Horror", will pursue the Dwarves. It spawns a few moments after the Drop Pod lands and will constantly stalk the team for the entire mission; it can even dig through terrain to get to its target. A ghostly aura and unsettling sounds surround the Unknown Horror, increasing in intensity as it gets closer to the player.
While it cannot be stopped or killed, the Unknown Horror is vulnerable to some slowing effects, such as the Scout's IFG. It deals slightly reduced damage compared to a standard Bulk Detonator. Salvage Operations cannot be Haunted.
Lethal Enemies
| "Melee damage from all enemies hurts a lot more than usual." +25% Hazard Bonus |

All melee damage dealt by enemies is doubled. Specifically, this means jump, bite, slash, carve and dig attacks, as well as Naedocyte Shockers' zaps and Deeptora Honeycombs' bug swarms. Area-of-effect stomps usually cause damage of another type than melee, such as Kinetic (Oppressors) or Explosive (Bulk Detonators, Dreadnoughts).
Projectile attacks from Mactera Spawn and Glyphid Acid Spitters (amongst other examples) are not affected by Lethal Enemies.
Keep a healthy distance from enemies such as Praetorians and Grunt Slashers.
Low Oxygen
| "The mission area has particularly low concentrations of breathable air. Dwarves must frequently replenish their O2 by standing near one of the tanks attached to the M.U.L.E. and other devices." +20% Hazard Bonus |

These caves have toxic air, meaning the Dwarves only get a limited oxygen supply (seen on the right side of the screen). A full tank of O2 lasts for approximately a minute, being depleted at a rate of 1.5% per second, with increasingly frantic beeps sounding as the supply begins to run out. Should this happen, the Dwarf will start rapidly taking 10 damage per second, which is not blocked by Dwarves' personal shields.
Oxygen is refilled at a rate of 10% per second by staying adjacent to a Drop Pod, Resupply Pods, the Mine Head or the M.U.L.E.
| O2 Supplying Object | Radius | Center Offset | |
|---|---|---|---|
| M.U.L.E. | 3.0m | 0.5m | |
| Resupply Pod | 3.0m | 1.0m | |
| Drop Pod | 10.0m | 2.5m | |
| Escape Pod | 6.0m | 2.0m | |
| Uplink & Fuel Pod | 7.5m | n/a | (Salvage Operation only) |
| Black Box | 7.5m | n/a | (Deep Dive only) |
| Mine Head | 8.0m | 1.8m | (Point Extraction only) |
| Refinery | 8.0m | 1.0m | (On-site Refining only) |
| Doretta | 5.0m | 0.5m | (Escort Duty only) |
Reviving a Dwarf sets their supply of oxygen to 42%. Through reviving each other continually, careful teamwork can carry the day even when far away from any source of oxygen. This is one reason to recommend not straying too far from the M.U.L.E. in low oxygen conditions.
Mactera Plague
| "Most threats in this mission will come from the air, the caves are full of Mactera." +20% Hazard Bonus |

The bulk of enemies spawned are Mactera (Spawn, Goo Bombers and Grabbers), with Glyphids and other aliens only appearing occasionally or during Swarms.
Bring along highly accurate and damaging weapons such as the Powered Minigun or the M1000 Classic to quickly deal with these pests.
Parasites
| "Something is eating the creatures from the inside out, and will go after you as soon as their hosts die." +15% Hazard Bonus |

Enemies are infected with writhing Carnivorous Larvae, which will burst out and attack when their hosts are killed. Larger enemies such as Praetorians will spawn three parasites on death. Enemies of Tiny size, such as Swarmers and Naedocyte Shockers do not contain parasites. Stationary threats such as Spitball Infectors do not spawn parasites on death either.
The parasites are comparable to a Swarmer in terms of strength, but slightly less durable. They deal low damage and can be killed with just a single swing of the Pickaxe. Parasites cannot survive for long outside of their hosts and will die after performing a suicidal leaping attack. They nonetheless remain a noteworthy foe, especially when many burst out of their hosts during Swarms. The Gunner's Autocannon and the Driller's Flamethrower can make short work of these constant small threats.
Parasites are able to pass through the Gunner's bubble shield.
Regenerative Bugs
| "After a few seconds of not taking damage, the creatures will start recovering health." +15% Hazard Bonus |

Any damaged enemy is capable of regenerating 5% of its maximum HP per second if it goes without taking damage for 3 seconds. The creature's regeneration will be halted for 3 seconds every time it is damaged again by any damage type -- weapons fire, natural hazards, and damage-over-time effects (being on fire, poisoned, irradiated or electrocuted). A few enemies will not regenerate their health: Glyphid Brood Nexus, Xynarch Charge-Sucker, Glyphid Bulk Detonator, Glyphid Dreadnought and Ebonite variants from the Ebonite Mutation Machine Event.
On higher Hazard Level missions and/or with more players present, enemies are more resistant to damage while their max HP stays the same. This means that the regenerative effect will be more noticeable.
Bring along weapons which can keep up pressure such as the Flamethrower or the Autocannon to prevent enemies from regenerating. On the plus side, Glyphids captured with the Beastmaster perk will still regenerate health, giving the tamed bug much more longevity.
Shield Disruption
| "Magnetic interference is causing all shields to malfunction." +30% Hazard Bonus |

Shields are permanently disabled by an electric field which encompases the entire map. To compensate, Dwarves take 30% less damage from enemy attacks and terrain hazards (such as Electrocrystals). Friendly fire damage and self damage is not affected by this damage reduction.
Due to the aforementioned damage reduction, Red Sugar is effectively 30% more potent during Shield Disruption missions.
The Gunner's Shield Generator functions as normal (repelling bugs and granting damage resistance) but will not restore personal shields.
Anomalies
![]()
Critical Weakness
| "Hitting Weak Points hurts even more than usual." |
Firing at an enemy's weak spot will deal five times as much damage, compared to the usual double or triple damage. This damage is multiplicative with weapon weakpoint damage bonuses and with enemies' innate weakpoint damage multipliers. Critical Weakness does not apply to creatures that do not have a weakspot, such as Loot Bugs.
Only attacks that deal instant, single-target damage benefit from the weakpoint multiplier. This rules out damage-over-time (DoT) and area-of-effect (AoE) attacks, such as the Driller's CRSPR Flamethrower. The "Embedded Detonator" Overclocks nor the Engineer's "Fatboy" Overclock for the PGL are also unaffected by Critical Weakness.
Most enemies will die to a single shot against their weakspots, especially with Hollowpoint rounds modifications. Highly effective against foes with giant obvious weak spots such as Praetorians and Dreadnoughts.
Double XP
| "Success will grant double the Experience Points of a standard mission." |
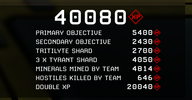
At the end of a mission, the ![]() Experience reward is doubled. However, mission failure will reward just the usual 25% of
Experience reward is doubled. However, mission failure will reward just the usual 25% of ![]() Credits and
Credits and ![]() Experience.
Experience.
Completing the secondary objective, collecting as many minerals as possible, obtaining Korlok Tyrant Shards and surviving Machine Events all contribute to the post-mission ![]() Experience reward, which can reach well into five-digit amounts.
Experience reward, which can reach well into five-digit amounts.
Gold Rush
| "We're rich! The mission area is full of extra rich gold veins." |
![]() Gold veins are twice as long compared to normal missions.
Gold veins are twice as long compared to normal missions.
When coupled with the Pots O' Gold beer buff, your amount of gold collected can easily reach into four-digit numbers -- but keep in mind this only applies to gold mined directly with the Pickaxe. Gold mined by Bosco or by destroying terrain with Satchel Charges, the Experimental Plasma Charger (among other methods) will not be increased by Pots O' Gold.
Golden Bugs
| "Every kill is worth gold, literally." |
Every killed enemy will drop one unit of ![]() Gold on the ground, which can be picked up by the Dwarves and then deposited into the M.U.L.E., Mine Head or Drop Pod. Killing large groups of weak enemies with area-of-effect attacks can quickly add up.
Gold on the ground, which can be picked up by the Dwarves and then deposited into the M.U.L.E., Mine Head or Drop Pod. Killing large groups of weak enemies with area-of-effect attacks can quickly add up.
In some circumstances, for example high Hazard Level missions with a full squad of players, enemies can spawn in such enormous numbers that the amount of gold they generate will start to cause lag and performance problems, especially if the mission lasts a long time.
The Pots O' Gold beer buff does not apply to the gold dropped from enemies when this Mutator is active.
Low Gravity
| "Mysterious gravitational irregularities result in lowered overall gravity in the mission area." |
Gravity is ~2.4 times lower than normal, allowing for higher jumps and making falling safer -- though falling from extreme heights or at extreme speeds can still cause fall damage.
Because fall damage in low gravity conditions is negligible, it's generally not worth getting the Tunnel Rat beer buff for these missions.
Dreadnought Elimination missions and Haunted Cave Warnings tend to be less difficult when low gravity is active, as it is much easier for Dwarves to stay out of these large creatures' attack range.
Some of the Dwarves' gear will function differently in low gravity.
- Flare throw distance is much greater. This can help to look for Gunk Seeds if no Scout is available to light up the ceilings.
- The Scout's Grappling Hook can be used for very high and long jumps and for mid-air mobility (to counteract the much longer airtime during these jumps).
- The Gunner's Cluster Grenade bomblets are dispersed further, blanketing a much larger area in explosions.
Mineral Mania
| "The mission area is home to unusually high concentrations of regional mineral resources." |
A biome's corresponding crafting resources appear more commonly. The actual amount of additional resource deposits is influenced by the random cave generation and can vary quite a bit.
Rich Atmosphere
| "A special mix of gasses in the air makes both Dwarves and aliens faster. As a side effect, everyone's voice is funnier than usual." |
Movement speed for Dwarves is increased by 50%. Enemies, M.U.L.E.s and Bosco are unaffected.
All of the Dwarves' voices are 50% higher pitched, though this has no practical effect on gameplay.
Volatile Guts
| "The odd composition of local food sources means all enemies violently combust upon death, causing area damage." |

When an enemy is killed it instantly explodes, causing damage to Dwarves and enemies alike. The explosive damage is lower than that from a Glyphid Exploder, but can still be lethal. Larger enemies produce bigger, more damaging explosions. Enemies of Tiny size, (Swarmers, Naedocyte Shockers, etc.) and stationary threats (such as Spitball Infectors) are unaffected by Volatile Guts and will not explode when killed.
Explosions may cause chain reactions in tightly-packed clusters of enemies, especially if they've been softened up beforehand. Mactera Spawn are vulnerable to these chain reactions, making Mactera Plague Swarms much easier to deal with.
Glyphid Exploders can be prevented from using their more powerful suicide attack by triggering the Volatile Guts effect first.
| Enemy Size | Area Damage | Radius | Maximum Damage Radius | Minimum Area Damage | Friendly Fire Modifier |
|---|---|---|---|---|---|
| Small | 80 | 1.5m | 1.0m | 25% | 8% |
| Medium | 120 | 2.5m | 1.8m | 70% | 5% |
| Large | 220 | 3.2m | 2.5m | 70% | 3% |
| Huge | 130 | 2.2m | 1.5m | 25% | 2% |
Trivia
Gallery
| |||||||||||