Regular dummkopf (talk | contribs) (hud toggle key) |
Mirageionova (talk | contribs) No edit summary |
||
| (15 intermediate revisions by 8 users not shown) | |||
| Line 1: | Line 1: | ||
| − | The '''Heads-up display''' or '''HUD''' provides the player with various information of their character's status and surroundings. There's two different variants of the HUD, a minimal variant which is used in the [[Space Rig]] and the normal one used while in a mission. The HUD can be toggled by holding H. |
+ | The '''Heads-up display''' or '''HUD''' provides the player with various information of their character's status and surroundings. There's two different variants of the HUD, a minimal variant which is used in the [[Space Rig]] and the normal one used while in a mission. The HUD can be toggled by holding the H key. |
=== Space Rig === |
=== Space Rig === |
||
| Line 18: | Line 18: | ||
* The player rank. |
* The player rank. |
||
* Left of hexagon player's nickname, rank title and available credits (from top to bottom). |
* Left of hexagon player's nickname, rank title and available credits (from top to bottom). |
||
| + | *Left of available credits is amount of Blank Matrix Cores owned. |
||
** To the left of the player's nickname a special icon can be displayed. Currently there's the Supporter Badge (received upon purchasing the Supporter Upgrade) and Developer Badge (shows up next to the developer's nickname). |
** To the left of the player's nickname a special icon can be displayed. Currently there's the Supporter Badge (received upon purchasing the Supporter Upgrade) and Developer Badge (shows up next to the developer's nickname). |
||
'''Bottom Center:''' |
'''Bottom Center:''' |
||
| − | * When a mission is selected a large box |
+ | * When a mission is selected a large box appears giving detailed information about the mission. |
** At the left [[biome]] and the biome's crafting [[resources]]. |
** At the left [[biome]] and the biome's crafting [[resources]]. |
||
** At the middle the mission type and mission's name. Below are the mission's objectives and their rewards. |
** At the middle the mission type and mission's name. Below are the mission's objectives and their rewards. |
||
| + | **On top of the mission type icon a diamond can appear if the current mission is needed for active assignment. |
||
** At the right the mission's overall difficulty. Hazard level and below are complexity and length icons. |
** At the right the mission's overall difficulty. Hazard level and below are complexity and length icons. |
||
| − | ** |
+ | ** On top of the box any active mutators are displayed. Left side shows anomalies, right side shows warnings. |
=== Mission === |
=== Mission === |
||
| Line 31: | Line 33: | ||
[[File:HUD_example_tiny.png|500xpx|right|thumb|Example of decreasing the HUD scale to minimum via options]] |
[[File:HUD_example_tiny.png|500xpx|right|thumb|Example of decreasing the HUD scale to minimum via options]] |
||
'''Top Left:''' |
'''Top Left:''' |
||
| − | * Active mutators. |
+ | * Active [[mutators]]. |
* Controls. If '''On-Screen Help''' setting is enabled. |
* Controls. If '''On-Screen Help''' setting is enabled. |
||
| Line 40: | Line 42: | ||
'''Top Right:''' |
'''Top Right:''' |
||
* The mission's primary and secondary objectives. |
* The mission's primary and secondary objectives. |
||
| − | * Team Depository. When the [[Laser Pointer]] is equipped. |
+ | * Team Depository. When the [[Laser Pointer]] is equipped and briefly when minerals are deposited. |
* Countdown timer. Displayed during escape and on various [[Salvage Operation]] objectives. |
* Countdown timer. Displayed during escape and on various [[Salvage Operation]] objectives. |
||
'''Center Right:''' |
'''Center Right:''' |
||
* Active cooldowns, such as Power Attack and [[Shield Generator]]. |
* Active cooldowns, such as Power Attack and [[Shield Generator]]. |
||
| + | * O2 level, if Low Oxygen [[Mutators#Low_Oxygen|mutator]] is in effect. |
||
'''Bottom Right:''' |
'''Bottom Right:''' |
||
| Line 50: | Line 53: | ||
** Sentry number, ammo and status are shown. |
** Sentry number, ammo and status are shown. |
||
** Total carried sentry ammo shown below sentry stats. |
** Total carried sentry ammo shown below sentry stats. |
||
| − | * [[Equipment]] name and type. |
+ | * [[Equipment]] name and type. Appears when changing equipment or using the Laser Pointer. |
* Equipment ammunition. |
* Equipment ammunition. |
||
* Headlight status, grenade amount and [[flare]] status. |
* Headlight status, grenade amount and [[flare]] status. |
||
| Line 65: | Line 68: | ||
** When voice chatting a speaker icon will appear next to the talking player. |
** When voice chatting a speaker icon will appear next to the talking player. |
||
** In solo [[Bosco]]'s stats will be shown. Revive count, rocket status. |
** In solo [[Bosco]]'s stats will be shown. Revive count, rocket status. |
||
| − | ** On top of Bosco's avatar an icon will be displayed when it's doing something. Yellow light bulb when lighting up an area, orange pickaxe when mining or carrying an object, red fist when attacking hostile creatures. |
+ | *** On top of Bosco's avatar an icon will be displayed when it's doing something. Yellow light bulb when lighting up an area, orange pickaxe when mining or carrying an object, red fist when attacking hostile creatures. |
* Class avatar and promotion rank. |
* Class avatar and promotion rank. |
||
** At the left of class avatar, host icon can be displayed. |
** At the left of class avatar, host icon can be displayed. |
||
** When voice chatting a speaker icon will appear. |
** When voice chatting a speaker icon will appear. |
||
| + | * Active perks and amount of uses or the cooldown they have. |
||
| − | * |
+ | *Class name. Can be toggled in the options. |
* Player shield and [[health]]. |
* Player shield and [[health]]. |
||
* Player nickname. Can be toggled in the options. |
* Player nickname. Can be toggled in the options. |
||
| Line 78: | Line 82: | ||
* Creature health bar. |
* Creature health bar. |
||
* Player markers. Are displayed regardless if Laser Pointer was equipped. |
* Player markers. Are displayed regardless if Laser Pointer was equipped. |
||
| − | ** |
+ | ** Markers themselves display the player's class, marked object's name and marker's distance from the player. |
* Personal markers, [[M.U.L.E.]], [[Bosco]], [[Drop Pod]] and [[Resupply Pod]] markers. When the Laser Pointer is equipped. |
* Personal markers, [[M.U.L.E.]], [[Bosco]], [[Drop Pod]] and [[Resupply Pod]] markers. When the Laser Pointer is equipped. |
||
* Subtitles spoken by other teammates. Can be toggled in the options. |
* Subtitles spoken by other teammates. Can be toggled in the options. |
||
| + | |||
=== Options === |
=== Options === |
||
These settings allow for the player to customize their HUD. |
These settings allow for the player to customize their HUD. |
||
| Line 91: | Line 96: | ||
'''UI''' |
'''UI''' |
||
* '''On-Screen Help''' - Shows the controls at the ''top left'' of the screen. This is automatically enabled during the tutorial mission. |
* '''On-Screen Help''' - Shows the controls at the ''top left'' of the screen. This is automatically enabled during the tutorial mission. |
||
| − | * '''Show FPS |
+ | * '''Show FPS Counter''' - Displays the frame rate in-game at the ''top right'' of the screen. |
* '''Show Network Stats''' - Displays the sent and received kilobytes per second at the ''top right'' of the screen. |
* '''Show Network Stats''' - Displays the sent and received kilobytes per second at the ''top right'' of the screen. |
||
* '''UI Scale''' - Despite the name, it will only adjust the mission HUD size. |
* '''UI Scale''' - Despite the name, it will only adjust the mission HUD size. |
||
* '''Language''' - Allows for a language change. Affecting the HUD, UI and in-world text. |
* '''Language''' - Allows for a language change. Affecting the HUD, UI and in-world text. |
||
* '''Compass''' - Toggles compass seen at the ''top'' of the screen. |
* '''Compass''' - Toggles compass seen at the ''top'' of the screen. |
||
| − | * '''Enemy Health''' - Toggles |
+ | * '''Enemy Health''' - Toggles whether creature health will be displayed when looking at one. |
* '''Depth''' - Toggles the depth meters seen at the very ''top'' of the screen. |
* '''Depth''' - Toggles the depth meters seen at the very ''top'' of the screen. |
||
* '''Name and Class''' - Toggles the player and class names seen at the ''bottom left'' of the screen, below and above the health bar. |
* '''Name and Class''' - Toggles the player and class names seen at the ''bottom left'' of the screen, below and above the health bar. |
||
| Line 102: | Line 107: | ||
{{mechanics nav}} |
{{mechanics nav}} |
||
| + | [[Category:Mechanics]] |
||
| + | [[es:HUD]] |
||
Revision as of 18:14, 28 June 2021
The Heads-up display or HUD provides the player with various information of their character's status and surroundings. There's two different variants of the HUD, a minimal variant which is used in the Space Rig and the normal one used while in a mission. The HUD can be toggled by holding the H key.
Space Rig
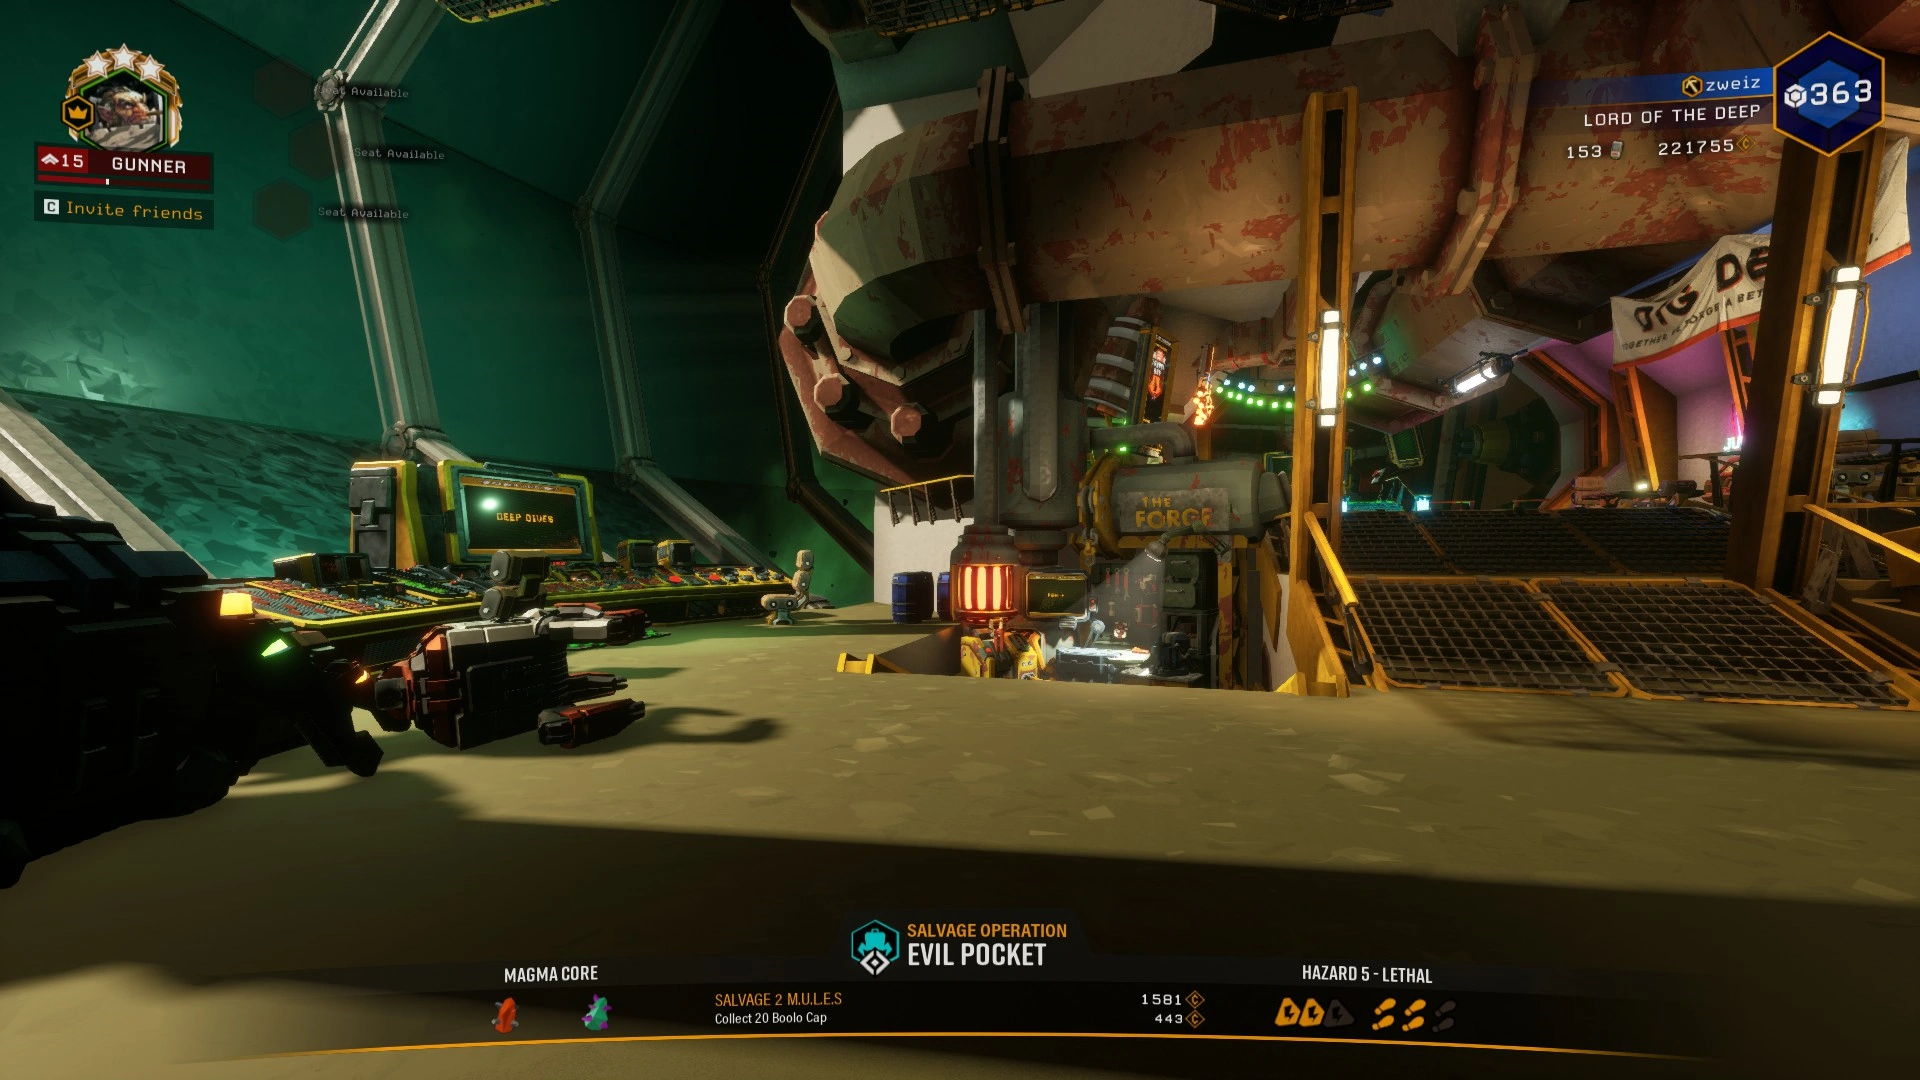
Player's HUD in the Space Rig with a Mission selected
Top Left:
- Class level, promotion rank and avatar.
- Left of class avatar an icon can be displayed indicating whether the player is hosting.
- Below class stats a small box reminding how to invite other players.
- Right of class avatar any active beer buffs are displayed.
- Right of class stats three hexagon displays player slots.
- Other player's nickname, class, class level and player rank will be displayed if there are more than one player in the current server.
Top Center:
- Mission Control messages.
- Mission start countdown.
Top Right:
- The player rank.
- Left of hexagon player's nickname, rank title and available credits (from top to bottom).
- Left of available credits is amount of Blank Matrix Cores owned.
- To the left of the player's nickname a special icon can be displayed. Currently there's the Supporter Badge (received upon purchasing the Supporter Upgrade) and Developer Badge (shows up next to the developer's nickname).
Bottom Center:
- When a mission is selected a large box appears giving detailed information about the mission.
- At the left biome and the biome's crafting resources.
- At the middle the mission type and mission's name. Below are the mission's objectives and their rewards.
- On top of the mission type icon a diamond can appear if the current mission is needed for active assignment.
- At the right the mission's overall difficulty. Hazard level and below are complexity and length icons.
- On top of the box any active mutators are displayed. Left side shows anomalies, right side shows warnings.
Mission
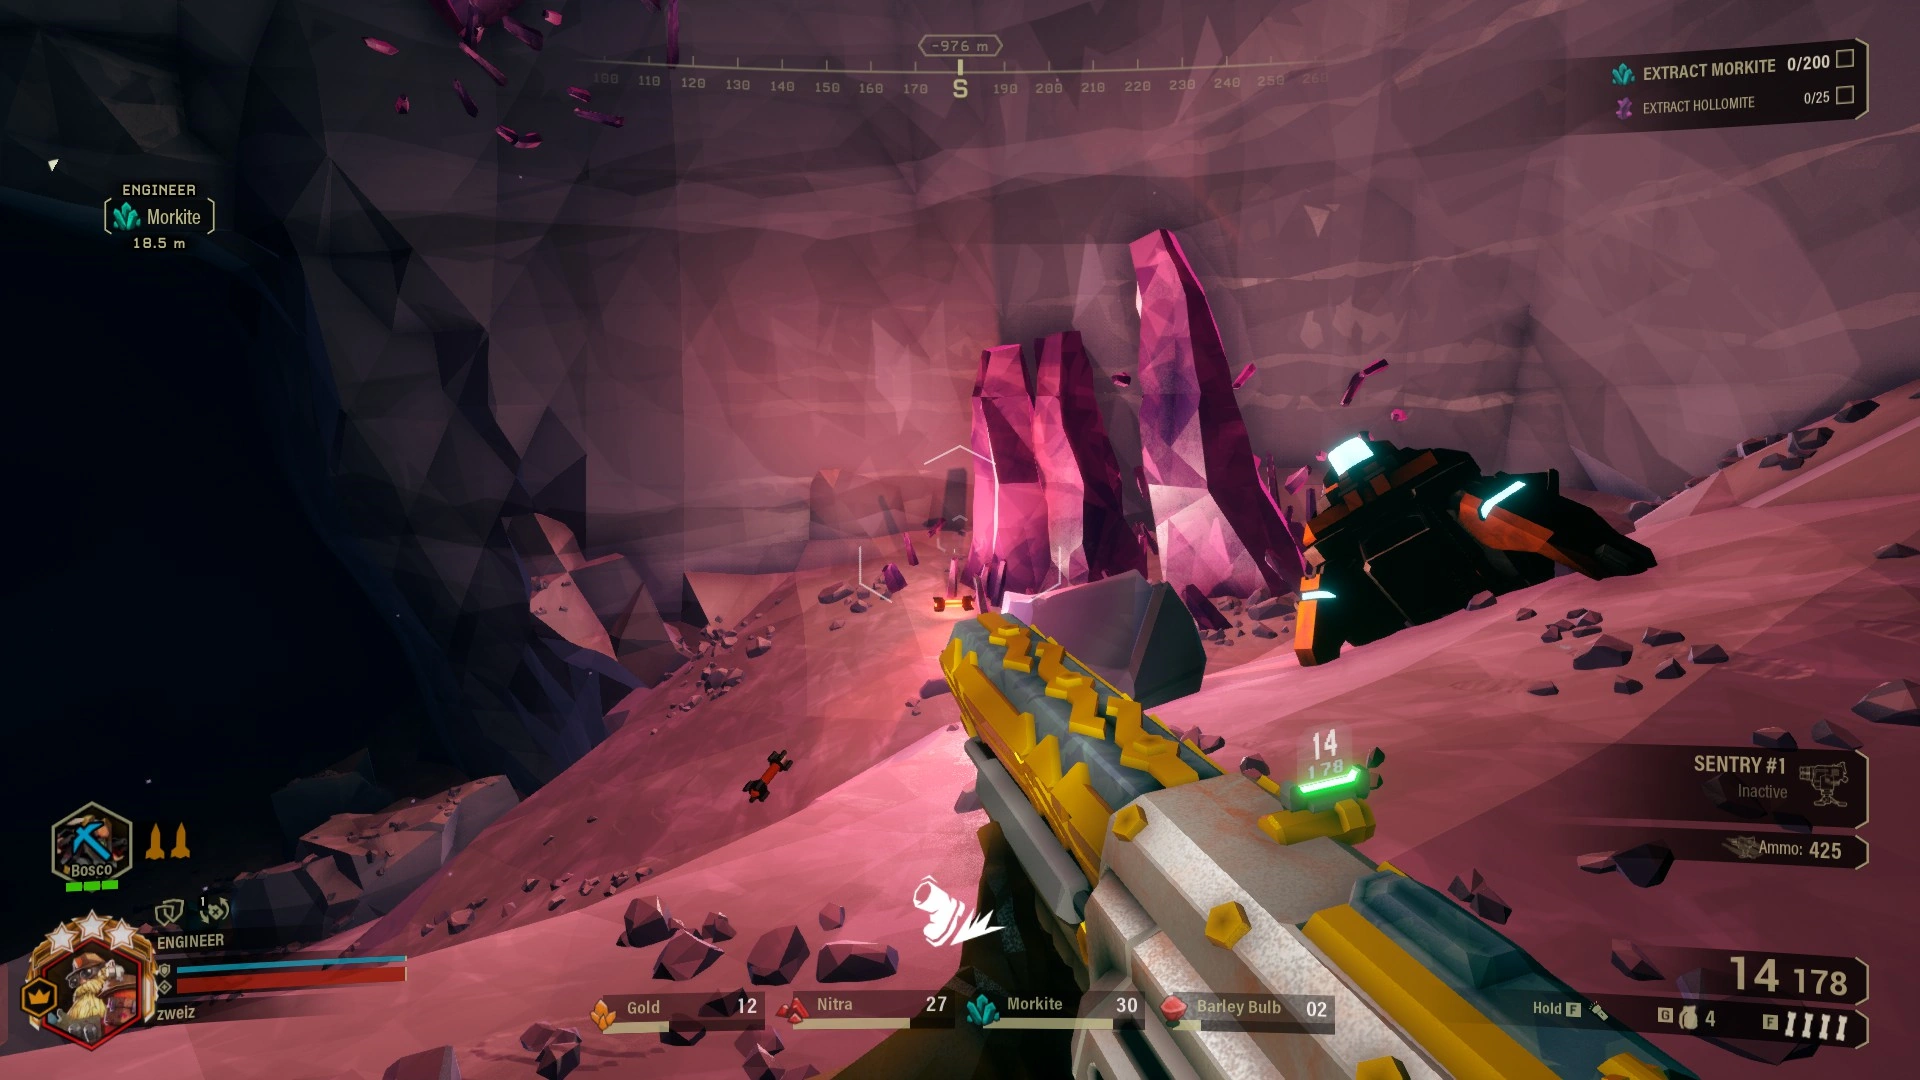
Player's HUD during a Mining Expedition and a Laser Pointer was recently used
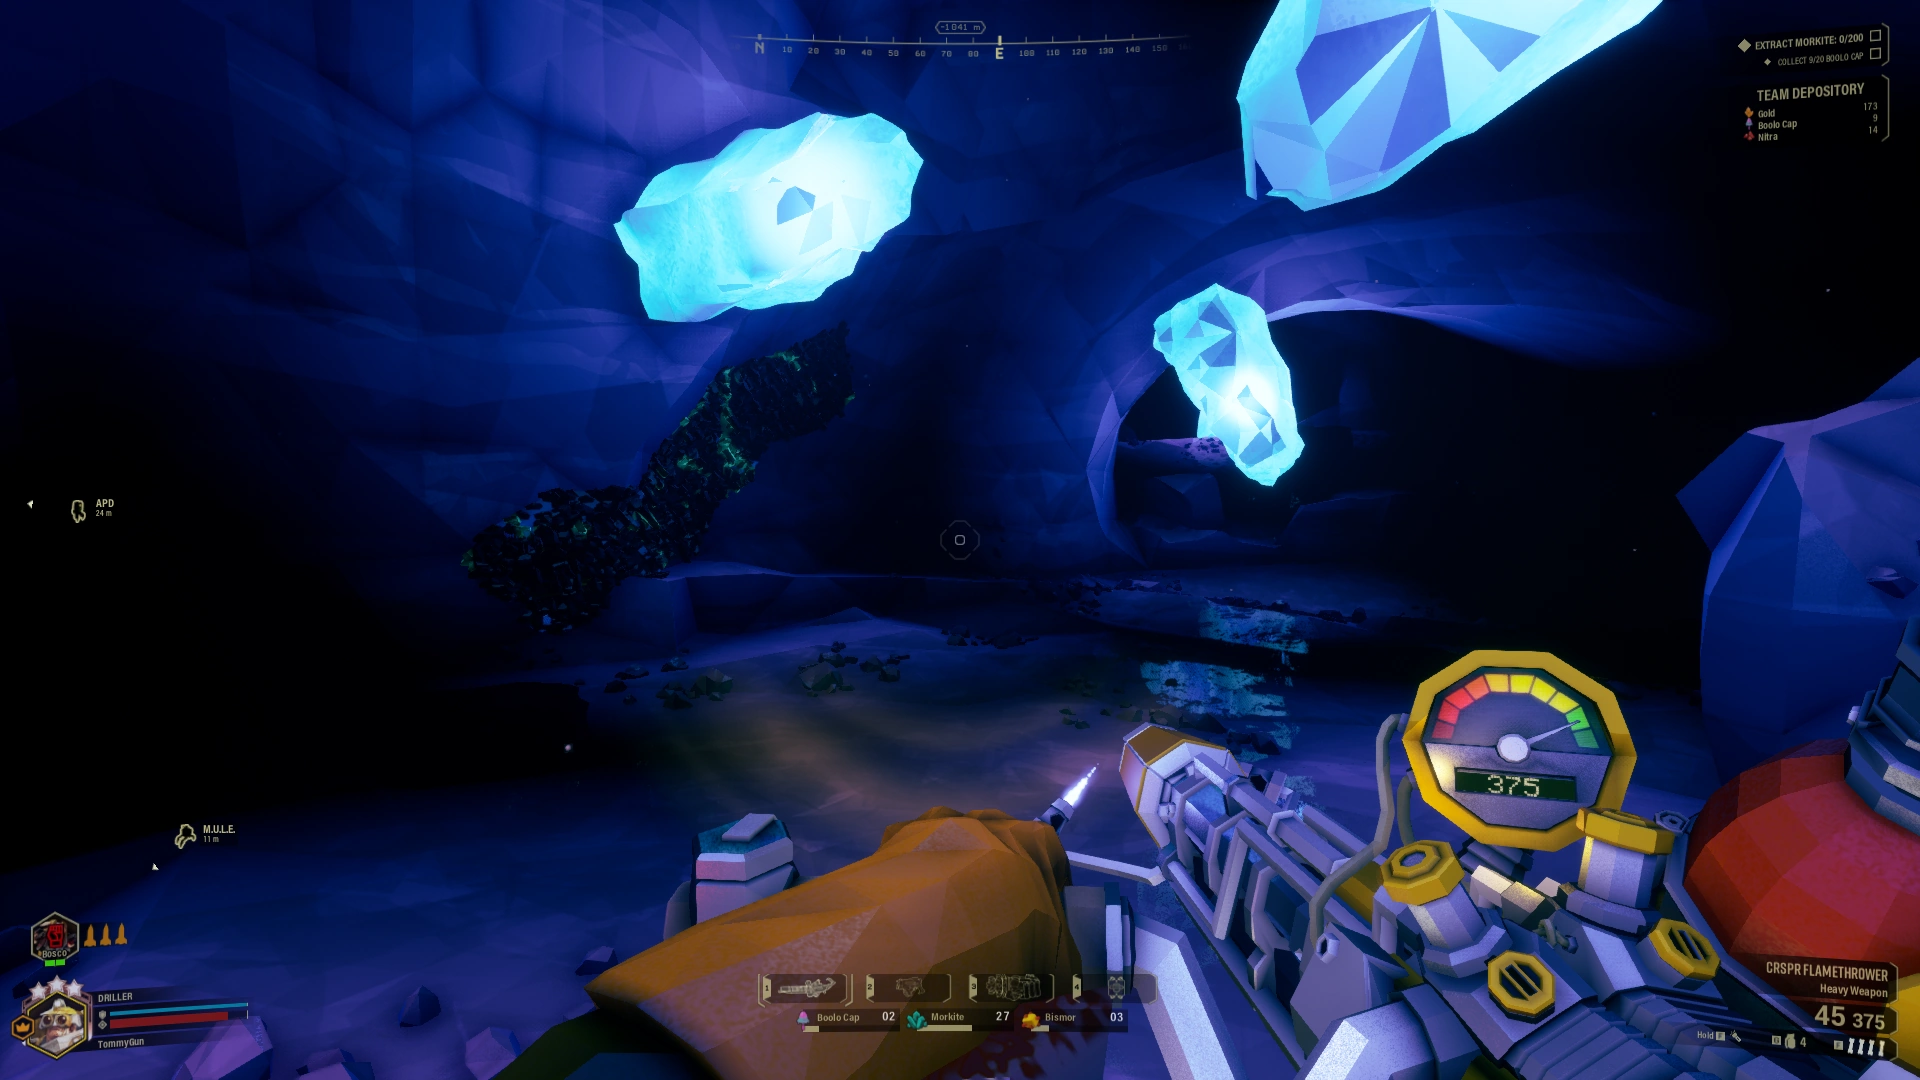
Example of decreasing the HUD scale to minimum via options
Top Left:
- Active mutators.
- Controls. If On-Screen Help setting is enabled.
Top Center:
- The player's depth and a compass. Can be toggled in the options.
- Mission Control messages.
Top Right:
- The mission's primary and secondary objectives.
- Team Depository. When the Laser Pointer is equipped and briefly when minerals are deposited.
- Countdown timer. Displayed during escape and on various Salvage Operation objectives.
Center Right:
- Active cooldowns, such as Power Attack and Shield Generator.
- O2 level, if Low Oxygen mutator is in effect.
Bottom Right:
- Sentry stats, when playing as the Engineer.
- Sentry number, ammo and status are shown.
- Total carried sentry ammo shown below sentry stats.
- Equipment name and type. Appears when changing equipment or using the Laser Pointer.
- Equipment ammunition.
- Headlight status, grenade amount and flare status.
Bottom Center:
- Tutorial hints. Can be toggled and reset in the options.
- Status Effects and player's Temperature when under the effects of either.
- Subtitles spoken by the player. Can be toggled in the options.
- Available equipment.
- Resources carried by the player.
Bottom Left:
- Other player class avatar, promotion rank, nickname and health bar.
- When voice chatting a speaker icon will appear next to the talking player.
- In solo Bosco's stats will be shown. Revive count, rocket status.
- On top of Bosco's avatar an icon will be displayed when it's doing something. Yellow light bulb when lighting up an area, orange pickaxe when mining or carrying an object, red fist when attacking hostile creatures.
- Class avatar and promotion rank.
- At the left of class avatar, host icon can be displayed.
- When voice chatting a speaker icon will appear.
- Active perks and amount of uses or the cooldown they have.
- Class name. Can be toggled in the options.
- Player shield and health.
- Player nickname. Can be toggled in the options.
Other:
- Crosshair. At the center of the screen.
- Toggling HUD or Headlight. At the center of the screen.
- Creature health bar.
- Player markers. Are displayed regardless if Laser Pointer was equipped.
- Markers themselves display the player's class, marked object's name and marker's distance from the player.
- Personal markers, M.U.L.E., Bosco, Drop Pod and Resupply Pod markers. When the Laser Pointer is equipped.
- Subtitles spoken by other teammates. Can be toggled in the options.
Options
These settings allow for the player to customize their HUD.
Gameplay
- Enable Tutorial Hints - Enabling this will periodically display various hints during a mission.
- Reset Tutorials - Resets the hints and will show the player any hints they might've already seen.
- Subtitles - Although Mission Control's lines are always written at the top of the screen when he speaks, enabling this will also display subtitles for various Dwarf voice lines. The subtitle boxes will follow whichever dwarf has spoken, if the user has spoken the subtitle box will appear at the bottom of the screen.
UI
- On-Screen Help - Shows the controls at the top left of the screen. This is automatically enabled during the tutorial mission.
- Show FPS Counter - Displays the frame rate in-game at the top right of the screen.
- Show Network Stats - Displays the sent and received kilobytes per second at the top right of the screen.
- UI Scale - Despite the name, it will only adjust the mission HUD size.
- Language - Allows for a language change. Affecting the HUD, UI and in-world text.
- Compass - Toggles compass seen at the top of the screen.
- Enemy Health - Toggles whether creature health will be displayed when looking at one.
- Depth - Toggles the depth meters seen at the very top of the screen.
- Name and Class - Toggles the player and class names seen at the bottom left of the screen, below and above the health bar.
| |||||||||||