PunchyTurtle (talk | contribs) |
FabrizioBS (talk | contribs) (back to proper version) Tag: Source edit |
||
| (31 intermediate revisions by 18 users not shown) | |||
| Line 1: | Line 1: | ||
| − | {{quote|Turrets and explosions...you've come to the right place.|The Engineer||Engineer portrait.png}} |
+ | {{quote| Turrets and explosions...you've come to the right place. |The Engineer||Engineer portrait.png}} |
{{Class infobox |
{{Class infobox |
||
| Line 8: | Line 8: | ||
}} |
}} |
||
| + | The '''Engineer''' is one of the four [[Dwarves]] in the game. |
||
| − | The '''Engineer''' is one of the four playable [[dwarves]] in the game. He specializes in area denial with his [[LMG Gun Platform|Sentry Guns]] and can provide access to out-of-reach locations with his [[Platform Gun]], while being armed with his [["Warthog" Auto 210|Combat Shotgun]] and [[Deepcore 40mm PGL|Grenade Launcher]] to fight back with. |
||
| ⚫ | As the '''Engineer''', you carry two essential items for surviving the caves - the '''[[Platform Gun]]''' shoots climbable platforms onto any surface, and your automated '''[[LMG Gun Platform|Sentry Turrets]]''' lay down blistering hails of support fire - if you manage to get it set up before you're killed. You may not be the sturdiest of Dwarves, but your '''[["Warthog" Auto 210|Combat Shotgun]]''' and devastating '''[[Deepcore 40mm PGL|Grenade Launcher]]''' still makes you a formidable opponent. |
||
| − | === About === |
||
| ⚫ | The Engineer can choose from three different grenades to use: [[L.U.R.E.|The L.U.R.E.]], which creates a holographic Dwarf decoy that distracts enemies from himself and his allies, the [[Plasma Burster]], which creates four explosions per grenade, and the [[Proximity Mine]], that only explodes when a medium or larger size enemy enters its trigger zone. |
||
| ⚫ | |||
| + | Unlockable weapons include: |
||
| − | As the Engineer, it is your job to support your team mates by providing them with ground to stand on using your [[Platform Gun]] and assist in combat using your [[LMG Gun Platform]], [["Warthog" Auto 210]] shotgun, and [[Deepcore 40mm PGL|Grenade Launcher]]. Place your Sentry Turrets in defensive positions to protect your team, and be sure to use your platforms to help your team mobilize during missions. You can team up with the [[Scout]] to access resources that are out of reach, or work with the [[Driller]] to shape the battlefield in your favor. |
||
| + | * [["Stubby" Voltaic SMG]]: a submachine gun that has a chance to [[Status_Effects#Electrocution|electrocute]] the target. |
||
| − | |||
| + | * [[Breach Cutter]]: a cannon firing a plasma wave that penetrates enemies and terrain. |
||
| ⚫ | The |
||
| + | * [[LOK-1 Smart Rifle]]: a rifle that comes equipped with homing capabilities. |
||
| − | |||
| − | The Engineer is the closest thing in Deep Rock Galactic to a support class. He specializes in area control with his Sentries, which are able to deny passage of enemies through set locations, and his Platform Gun not only grants access to distant resources but can make otherwise hazardous terrain safe again. Indeed, the Engineer performs excellently in Swarms and gamemodes which don't require much movement such as Point Extraction and Elimination. |
||
| − | |||
| − | While his support options are his most valuable assets the Engineer has access to a set of standard but nonetheless devastating weapons. His Combat Shotgun is capable of killing most Glyphids with one shot to a weak spot, including on higher difficulties with the right upgrades and his Grenade Launcher can deal immense damage to clusters of enemies and single targets alike. His Breach Cutter, an Unlockable weapon, is able to cleave right through large targets such as Glyphid Praetorians and kill them in just two shots, boasting unparalleled piercing capability at the cost of a low clip size. |
||
| − | |||
| − | However, the Engineer is not without flaws. His overall mobility is limited compared to the other classes; he relies on his Platform Gun to help him clear large gaps and scale walls which can burn through its somewhat limited ammo fast. In gamemodes which require constant movement such as Mining Expeditions and Egg Hunts it can be difficult for the Engineer to maintain presence as he will need to keep constantly moving and rebuilding his Sentries (though certain upgrades can help to mitigate this issue.) Finally his weapons have range issues, particularly his Primary Weapons the Combat Shotgun and Voltaic SMG, which are really only effective at close range. |
||
| − | |||
| − | Playing Engineer requires strong spatial awareness and knowledge of the game's mechanics. Always be aware of what your teammates are doing and pay attention to their callouts; they may need you to place a platform somewhere. |
||
=== Equipment === |
=== Equipment === |
||
| − | + | Each class has nine pieces of [[Equipment]], each of which can be individually upgraded using {{credits}} [[Credits]] and [[Resources#Crafting.2FUpgrades|crafting resources]]. There are three unlockable weapons per class, two primaries and a secondary weapon. Each weapon has its own [[assignments|assignment]] you are required to complete to unlock the weapon. Once an assignment for a weapon has been completed it then can be purchased within the upgrade terminal. |
|
| − | |||
| ⚫ | |||
| − | |||
| − | === Basic Tips and Strategy === |
||
| − | |||
| − | * '''[["Warthog" Auto 210]]''' |
||
| − | ** The Warthog is best used up-close where all the pellets fired in one shot are most likely to hit, dealing the most damage possible. |
||
| − | ** Equip the Turret Whip modification to get the most out of your turrets. Each overcharged turret shot consumes 10 ammo and creates a powerful blast. |
||
| − | ** Miner Adjustments can massively increase the damage output of the Warthog but choosing this upgrade can burn through ammo fast. |
||
| − | **The Warthog carries a lot of reserve ammo at 90 extra shells. |
||
| − | |||
| − | * '''[[Deepcore 40mm PGL]]''' |
||
| − | ** The Grenade Launcher can clear out a large group of enemies with a single shot. |
||
| − | ** Minerals can be gathered from high deposits by shooting grenades at them. |
||
| − | ** Any explosives will cause Glyphids to flee briefly, use the grenade launcher to keep dangerous enemies away from downed allies or objectives. |
||
| − | ** The amount of grenades you carry is quite limited, at only 8 in reserve by default. Make sure to use your grenades wisely. |
||
| − | |||
| − | * '''[["Stubby" Voltaic SMG]]''' |
||
| − | ** This SMG fires very quickly, but its spread also increases very quickly and recovers slowly. As a result, tap-firing is the only option to target foes at long range. |
||
| − | ** Electrocuted targets move slower and certain upgrades cause them to take extra damage from the SMG while they suffer the effect. |
||
| − | |||
| − | * '''[[Breach Cutter]]''' |
||
| − | ** The Breach Cutter goes through multiple targets, including allies, be careful in which direction you fire. |
||
| − | ** It is an excellent weapon for taking out tightly-clustered groups of enemies and can cut right through any target, even bulkier foes like Glyphid Praetorians. |
||
| − | ** This weapon deals damage for every moment that enemies are making contact with the beam. To inflict the most damage against bigger foes such as Praetorians, line up your shot so that it will make as much contact as possible. This is generally easiest to do while facing them from their front or back. |
||
| − | |||
| − | * '''[[LMG Gun Platform]]''' |
||
| − | ** Choosing either the Gemini System or LMG MKII upgrades is an important choice. Although the MKII deals increased damage, two sentries from the Gemini System mod technically deals double damage. Ammo management is much harder with two sentries however, and the MKII is more than capable of focusing down targets with ease by itself. |
||
| − | ** During Salvage Operation missions the engineer is a very viable class as his sentries provide extra firepower during the holdout phases, and his platform gun can expand the defender's area when terrain is uneven or dangerous. |
||
| − | ** Press the reload key to switch between which sentry you'd like to redeploy when both are placed down with the Gemini System upgrade. |
||
| − | ** Other players, regardless of class, can help the Engineer build his sentry guns. |
||
| − | ** Recalling a sentry gun will fully restore its ammo when it is redeployed. For this reason it is often easier to simply recall a sentry and rebuild it rather than refilling its ammo, especially at a distance. |
||
| − | ** Try to be proactive with your sentry placements. Keep moving them in accordance to the shifting battlefield and remember to recall them once a fight is finished to have them immediately available for redeployment once a fight is over. You will get much more use out of your sentries keeping them by your side, rather than leaving them inactive by an objective. |
||
| − | |||
| − | * '''[[Platform Gun]]''' |
||
| − | ** Pair up your Platform Gun with a Scout to reach ceiling [[resources]] easier. |
||
| − | ** Use platforms to bridge across small gaps. |
||
| − | ** When scaling a wall with the Platform Gun, take advantage of ledge grab to conserve ammo. |
||
| − | ** The Plastcrete MKII modification upgrades the platforms to decrease fall damage. Shoot a platform directly below you when falling to prevent a gruesome death. |
||
| − | **The Repellant Additive modification can be used to funnel swarms into tighter/ more predictable killzones. |
||
| − | **With careful shots in a tight corridor, it is possible to completely seal a tunnel shut using platforms. This may be useful during Swarms in order to block off an angle of attack, and they can be easily dug through when needed. |
||
| ⚫ | |||
| − | * '''[[Grenade|Grenades]]''' |
||
| − | ** '''[[L.U.R.E.]]''' |
||
| − | *** Throw this grenade to cover retreats to potentially force all enemies chasing you and your teammates to focus the hologram instead. |
||
| − | *** Although the hologram serves as an excellent distraction, its low health means it will be whittled down quickly by large groups of enemies. |
||
| − | *** For best results, throw this grenade at enemies who don't already have a target; they will swarm the lure first, allowing you to round them up for easy killing. |
||
| − | *** Larger enemies may not be so easily fooled by the hologram. |
||
| − | *** The "Dance Moves" statistic is purely cosmetic; the dance moves of the hologram do not influence its effectiveness. |
||
| − | ** '''[[Plasma Burster]]''' |
||
| − | *** This grenade chains explosions together from the first moment it hits the ground. It detonates 4 times, dealing 240 damage in total. |
||
| − | *** Much like the Breach Cutter, this grenade is best used when enemies are arranged in a certain way. It's best used for targeting "strips" of enemies which are running towards the player in a long line. |
||
| − | ** '''[[Proximity Mine]]''' |
||
| − | *** This grenade needs three seconds of preparation time before it can detonate. When primed it emits a blinking noise and yellow radius circle, similar to the Driller's Remote Explosives. |
||
| − | *** If you can hear monsters from behind a Compressed Dirt wall, try placing a couple of these mines around the dirt for an ambush attack - though try to place them in a way so that your teammates don't get damaged. |
||
| − | *** When a Swarm is announced, throw these mines down chokepoints where enemies are likely to cluster together. |
||
=== Voice Responses === |
=== Voice Responses === |
||
| − | ===== Class Selected ===== |
+ | ===== Class Selected / Joining An Active Mission ===== |
* "Let's play this smart for once, huh?" |
* "Let's play this smart for once, huh?" |
||
* "It's all about securing the caves, you know?" |
* "It's all about securing the caves, you know?" |
||
| Line 101: | Line 40: | ||
=== Trivia === |
=== Trivia === |
||
| − | * The Engineer is the only |
+ | * The Engineer is the only Dwarf whose default appearance in official artwork varies. Sometimes he is shown with a full beard and mustache, other times clean shaven with only the latter. |
<br/> |
<br/> |
||
| Line 108: | Line 47: | ||
[[Category:Dwarves]] |
[[Category:Dwarves]] |
||
[[es:Ingeniero]] |
[[es:Ingeniero]] |
||
| + | [[ru:Инженер]] |
||
Revision as of 19:36, 6 January 2022
| “ | Turrets and explosions...you've come to the right place. |
| — The Engineer |
| Engineer | |
|---|---|

| |
| Class Details | |
| Icon | |
| Voice Pitch | 105% |
The Engineer is one of the four Dwarves in the game.
As the Engineer, you carry two essential items for surviving the caves - the Platform Gun shoots climbable platforms onto any surface, and your automated Sentry Turrets lay down blistering hails of support fire - if you manage to get it set up before you're killed. You may not be the sturdiest of Dwarves, but your Combat Shotgun and devastating Grenade Launcher still makes you a formidable opponent.
The Engineer can choose from three different grenades to use: The L.U.R.E., which creates a holographic Dwarf decoy that distracts enemies from himself and his allies, the Plasma Burster, which creates four explosions per grenade, and the Proximity Mine, that only explodes when a medium or larger size enemy enters its trigger zone.
Unlockable weapons include:
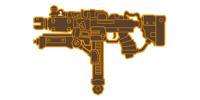
- "Stubby" Voltaic SMG: a submachine gun that has a chance to electrocute the target.
- Breach Cutter: a cannon firing a plasma wave that penetrates enemies and terrain.
- LOK-1 Smart Rifle: a rifle that comes equipped with homing capabilities.
Equipment
Each class has nine pieces of Equipment, each of which can be individually upgraded using ![]() Credits and crafting resources. There are three unlockable weapons per class, two primaries and a secondary weapon. Each weapon has its own assignment you are required to complete to unlock the weapon. Once an assignment for a weapon has been completed it then can be purchased within the upgrade terminal.
Credits and crafting resources. There are three unlockable weapons per class, two primaries and a secondary weapon. Each weapon has its own assignment you are required to complete to unlock the weapon. Once an assignment for a weapon has been completed it then can be purchased within the upgrade terminal.
| Primary | |||||||||||||||
|---|---|---|---|---|---|---|---|---|---|---|---|---|---|---|---|
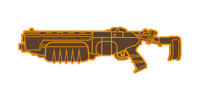 "Warthog" Auto 210 Shotgun |
 "Stubby" Voltaic SMG Submachine Gun |
 LOK-1 Smart Rifle Submachine Gun | |||||||||||||
| Secondary | |||||||||||||||
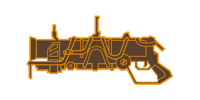 Deepcore 40mm PGL Heavy Weapon |
 Breach Cutter Heavy Weapon |
 Shard Diffractor Heavy Weapon | |||||||||||||
| Equipment | |||||||||||||||
 Platform Gun Support Tool |
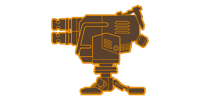 LMG Gun Platform Sentry Gun |
 "Owl" Armor Rig Armor Undersuit | |||||||||||||
| Throwables | |||||||||||||||
 L.U.R.E. Throwable |
 Plasma Burster Throwable |
 Proximity Mine Throwable |
 Shredder Swarm Throwable | ||||||||||||
Voice Responses
Class Selected / Joining An Active Mission
- "Let's play this smart for once, huh?"
- "It's all about securing the caves, you know?"
- "Quotas and objectives to fulfill! Let's get 'er done, lads!"
- "Infestation problems? Automated turret, mate."
- "Time for a cold one once this is done."
- "All in a day's work."
- "Turrets and explosions...you've come to the right place."
- "Cut 'em off, cut 'em down. That's the way."
- "Identify targets and exterminate. That's how it's done."
- "Elementary!"
Trivia
- The Engineer is the only Dwarf whose default appearance in official artwork varies. Sometimes he is shown with a full beard and mustache, other times clean shaven with only the latter.
| |||||