(Added an example) |
FabrizioBS (talk | contribs) (U34) |
||
| (20 intermediate revisions by 5 users not shown) | |||
| Line 1: | Line 1: | ||
{{Updated|U31}} |
{{Updated|U31}} |
||
| − | '''Area Damage''' is, as its name implies, any type of damage being dealt in an area. The damage done in that area may not be the same everywhere. For most |
+ | '''Area Damage''' is, as its name implies, any type of damage being dealt in an area. The damage done in that area may not be the same everywhere. For most weapons, more damage will be done near the center than at the edges. The damage done isn’t affected by what is inside that area and will remain the same no matter the number of enemies. |
== Common sources == |
== Common sources == |
||
| − | The most common source of '''Area Damage''' in game |
+ | The most common source of '''Area Damage''' in game comes in the form of [[Damage#Explosive|explosive damage]], but in practice any attack that deals damage in a sphere will behave the same.<br> |
| − | Examples of non explosive Area Damage include the second part of the melee attack from the [[Pickaxe]] (Melee damage), the |
+ | Examples of non explosive Area Damage include the second part of the [[Pickaxe#Damage_Breakdown|melee attack]] from the [[Pickaxe]] (Melee damage), the active [[See You In Hell]] (Disintegrate damage), [[Glyphid_Praetorian#Attacks|Death Cloud explosion]] (Fire + Heat damage).<br> |
| − | Area |
+ | Area Damage can also come from attacks that don't do any health damage but affect temperature instead like the [[Cryo Cannon]]'s [[Cryo Cannon#Cold_Radiance|Cold Radiance]] mod and [[Cryo Cannon#Snowball|Snowball]] overclock. |
== Terminology == |
== Terminology == |
||
| Line 20: | Line 20: | ||
*'''Minimum Area Damage''': The damage done at the edge of the '''Radius''' is determined as a percentage of the '''Area Damage'''. By default that value is 25%, but most weapons use a custom value (in blue).<br> |
*'''Minimum Area Damage''': The damage done at the edge of the '''Radius''' is determined as a percentage of the '''Area Damage'''. By default that value is 25%, but most weapons use a custom value (in blue).<br> |
||
The damage will scale linearly between the two radii (in yellow). |
The damage will scale linearly between the two radii (in yellow). |
||
| + | {{Clear}} |
||
== Mods and Overclock Increasing Radius == |
== Mods and Overclock Increasing Radius == |
||
Any Mod or Overclock that increase the '''Radius''' in game will only affect the '''Radius''', not the '''Maximum Damage Radius'''.<br> |
Any Mod or Overclock that increase the '''Radius''' in game will only affect the '''Radius''', not the '''Maximum Damage Radius'''.<br> |
||
| − | Only the Area Damage and Radius stats |
+ | Only the Area Damage and Radius stats are visible in game; the Maximum Damage Radius and Minimum Area Damage are hidden. |
| + | {| class="wikitable" |
||
| − | + | |+ [[Deepcore 40mm PGL]] |
|
| ⚫ | |||
| + | |- |
||
| − | | areaDamageAmount = 110 |
||
| + | ! colspan="2" | Without mods || colspan="2" | With Nails + Tape (Radius +1m) |
||
| − | | areaDamageType = Explosive |
||
| + | |- |
||
| − | | maximumDamageRadius = 1.5 |
||
| ⚫ | |||
| ⚫ | |||
| − | | |
+ | | maximumDamageRadius = 2 |
| ⚫ | |||
}} |
}} |
||
| + | | '''Area Damage''': 110 Explosive damage<br> |
||
| − | |||
| + | <span style="color: #FC5;">'''Radius''':</span> 3 m<br> |
||
| − | '''[[Deepcore 40mm PGL]] With Nails + Tape (Radius +.5m)''' |
||
| + | <span style="color: #F55;">'''Maximum Damage Radius''':</span> 2 m<br> |
||
| ⚫ | |||
| + | <span style="color: #55F;">'''Minimum Area Damage''':</span> 50 % |
||
| − | | areaDamageAmount = 110 |
||
| ⚫ | |||
| − | | areaDamageType = Explosive |
||
| maximumDamageRadius = 1.5 |
| maximumDamageRadius = 1.5 |
||
| radius = 4 |
| radius = 4 |
||
| − | | minimumAreaDamage = 15 |
||
}} |
}} |
||
| + | | '''Area Damage''': 110 Explosive damage<br> |
||
| + | <span style="color: #FC5;">'''Radius''':</span> 4 m<br> |
||
| + | <span style="color: #F55;">'''Maximum Damage Radius''':</span> 2 m<br> |
||
| + | <span style="color: #55F;">'''Minimum Area Damage''':</span> 50 % |
||
| ⚫ | |||
== Calculating the Damage Done at Any Range == |
== Calculating the Damage Done at Any Range == |
||
We will take as an example a weapon with the following stats: |
We will take as an example a weapon with the following stats: |
||
| − | {{Area Damage |
+ | <div style="float: left;">{{Area Damage |
| − | | areaDamageAmount = 60 |
||
| − | | areaDamageType = Explosive |
||
| maximumDamageRadius = 2 |
| maximumDamageRadius = 2 |
||
| radius = 4 |
| radius = 4 |
||
| + | }}</div> |
||
| − | | minimumAreaDamage = 20 |
||
| + | '''Area Damage''': 60 Explosive damage<br> |
||
| ⚫ | |||
| + | <span style="color: #FC5;">'''Radius''':</span> 4 m<br> |
||
| + | <span style="color: #F55;">'''Maximum Damage Radius''':</span> 2 m<br> |
||
| + | <span style="color: #55F;">'''Minimum Area Damage''':</span> 20 % |
||
| + | {{Clear}} |
||
That means that weapon will deal: |
That means that weapon will deal: |
||
| − | * 60 Explosive damage within a sphere of 2m or less (in the red area). |
+ | * '''60''' Explosive damage within a sphere of '''2m''' or less (in the red area). |
| − | * 20% of 60 = 12 Explosive damage at exactly 4m (on the blue line). |
+ | * '''20% of 60 = 12''' Explosive damage at exactly '''4m''' (on the blue line). |
* No damage beyond 4m (beyond the blue line). |
* No damage beyond 4m (beyond the blue line). |
||
| − | * |
+ | * Damage scales linearly between 2m and 4m (in the yellow area). |
| + | |||
| + | [[File:Area Radius Calcul Graph.png|700px|Example Graph]] |
||
| + | |||
| + | To calculate the damage done, since we know the damage scales between the two radii, that mean that the ratio of area damage |
||
| + | <math>\frac{Damage(x)-MinAreaDmg}{AreaDmg-MinAreaDmg}</math> will be equal to the corresponding ratio of radius <math>\frac{x-Radius}{MaxDmgRadius-Radius}</math>.<br><br> |
||
| + | From that point we can can deduce a formula to calculate the damage done '''Damage(x)''' depending on the distance from the center of the area '''x''':<br> |
||
| + | <math>\begin{align} |
||
| + | \frac{Damage(x) - MinAreaDmg}{AreaDmg - MinAreaDmg} & = \frac{x - Radius}{MaxDmgRadius - Radius} \\ |
||
| + | \frac{Damage(x) - MinAreaDmg}{AreaDmg - MinAreaDmg} & = \frac{Radius - x}{Radius - MaxDmgRadius} \\ |
||
| + | Damage(x) - MinAreaDmg & = (AreaDmg - MinAreaDmg) \cdot \frac{Radius - x}{Radius - MaxDmgRadius} \\ |
||
| + | Damage(x) & = (AreaDmg - MinAreaDmg) \cdot \frac{Radius - x}{Radius - MaxDmgRadius} + MinAreaDmg |
||
| + | \end{align}</math> |
||
| ⚫ | |||
| + | Using the above formula, we can find now find the damage done at any point inside the scaling area:<br> |
||
| + | <math>\begin{align} |
||
| + | Damage(x) & = (AreaDmg - MinAreaDmg) & \cdot & \frac{Radius - x}{Radius - MaxDmgRadius} & + & MinAreaDmg \\ |
||
| + | Damage(x) & = (60 - 0.2 \cdot 60) & \cdot & \frac{4 - x}{4 - 2} & + & 0.2 \cdot 60 |
||
| + | \end{align}</math><br><br> |
||
| + | |||
| + | <math>\begin{align} |
||
| + | Damage(2.5m) & = (60 - 12) \cdot \frac{4 - 2.5}{4 - 2} + 12 \\ |
||
| + | & = 48 \text { Explosive damage at 2.5m} \\ |
||
| + | Damage(3m) & = (60 - 12) \cdot \frac{4 - 3}{4 - 2} + 12 \\ |
||
| + | & = 36 \text { Explosive damage at 3m (value used for x in the example graph above)} \\ |
||
| + | Damage(4m) & = (60 - 12) \cdot \frac{4 - 4}{4 - 2} + 12 \\ |
||
| + | & = 12 \text { Explosive damage at 4m (match the damage of the Minimum Area Damage)} \\ |
||
| + | \end{align}</math><br><br> |
||
| + | |||
| + | == Special Case == |
||
| + | If for any reason the Radius is smaller than the Maximum Damage Radius (e.g. [[Deepcore 40mm PGL]] with the Overclock Hyper Propellant), then full damage will be done inside the Radius and no damage will be done between the Radius and Maximum Damage Radius. |
||
| − | To calculate the damage, we have 2 equations we have to solve in the form of <code>damage = distance × x + y</code> |
||
| − | <pre>First equation: 60 = 2x + y |
||
| − | Second equation: 12 = 4x + y |
||
| − | Solution: x = -24; y = 108</pre> |
||
| − | Now to calculate the damage done at any point, just reuse the previous formula replacing the x and y values by the one we just found: |
||
| − | <pre>Damage at 2.5m: 2.5 × (-24) + 108 = 48 Explosive damage |
||
| − | Damage at 2.8m: 2.8 × (-24) + 108 = 40.8 Explosive damage |
||
| − | Damage at 4m: 4 × (-24) + 108 = 12 Explosive damage |
||
| − | </pre> |
||
| ⚫ | |||
{{Mechanics nav}} |
{{Mechanics nav}} |
||
Revision as of 12:08, 22 April 2021
Area Damage is, as its name implies, any type of damage being dealt in an area. The damage done in that area may not be the same everywhere. For most weapons, more damage will be done near the center than at the edges. The damage done isn’t affected by what is inside that area and will remain the same no matter the number of enemies.
Common sources
The most common source of Area Damage in game comes in the form of explosive damage, but in practice any attack that deals damage in a sphere will behave the same.
Examples of non explosive Area Damage include the second part of the melee attack from the Pickaxe (Melee damage), the active See You In Hell (Disintegrate damage), Death Cloud explosion (Fire + Heat damage).
Area Damage can also come from attacks that don't do any health damage but affect temperature instead like the Cryo Cannon's Cold Radiance mod and Snowball overclock.
Terminology
- Area Damage: This is the maximum amount of damage that will be done, usually in a small radius at the center of the area (in red).
- Maximum Damage Radius: Read this as Radius where the Maximum Damage will be done. This is a, usually smaller, part of the area where the damage done will be equal to the Area Damage (in red).
- Radius: A concentric radius, usually bigger than the Maximum Damage Radius. At the edge of this area, you will do the minimum possible damage (in yellow).
- Minimum Area Damage: The damage done at the edge of the Radius is determined as a percentage of the Area Damage. By default that value is 25%, but most weapons use a custom value (in blue).
The damage will scale linearly between the two radii (in yellow).
Mods and Overclock Increasing Radius
Any Mod or Overclock that increase the Radius in game will only affect the Radius, not the Maximum Damage Radius.
Only the Area Damage and Radius stats are visible in game; the Maximum Damage Radius and Minimum Area Damage are hidden.
| Without mods | With Nails + Tape (Radius +1m) | ||
|---|---|---|---|
|
|
Area Damage: 110 Explosive damage Radius: 3 m |
|
Area Damage: 110 Explosive damage Radius: 4 m |
Calculating the Damage Done at Any Range
We will take as an example a weapon with the following stats:
Area Damage: 60 Explosive damage
Radius: 4 m
Maximum Damage Radius: 2 m
Minimum Area Damage: 20 %
That means that weapon will deal:
- 60 Explosive damage within a sphere of 2m or less (in the red area).
- 20% of 60 = 12 Explosive damage at exactly 4m (on the blue line).
- No damage beyond 4m (beyond the blue line).
- Damage scales linearly between 2m and 4m (in the yellow area).
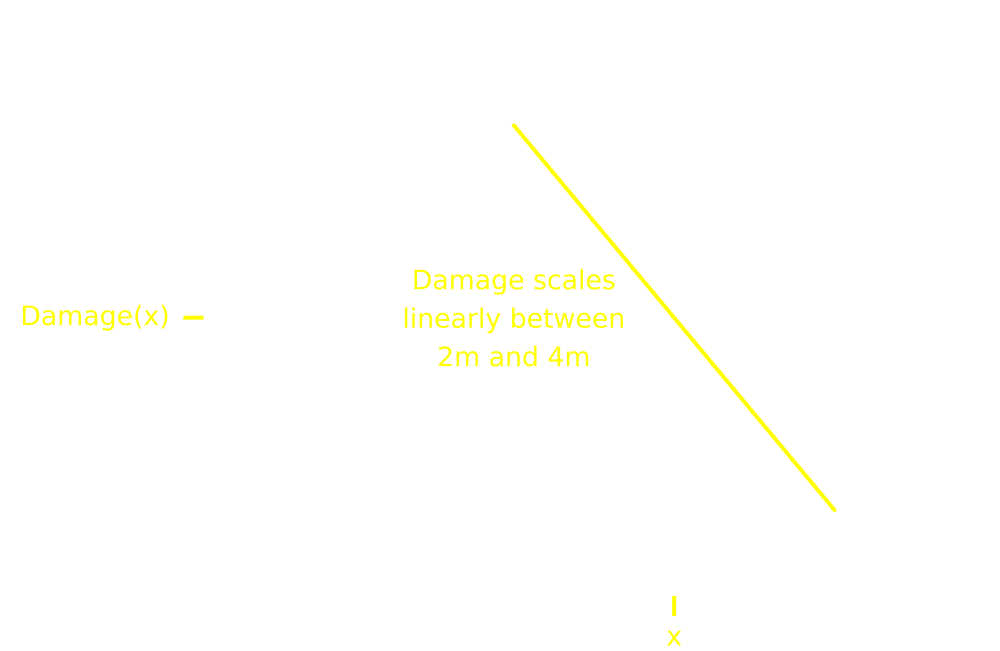
To calculate the damage done, since we know the damage scales between the two radii, that mean that the ratio of area damage
will be equal to the corresponding ratio of radius .
From that point we can can deduce a formula to calculate the damage done Damage(x) depending on the distance from the center of the area x:
Using the above formula, we can find now find the damage done at any point inside the scaling area:


Special Case
If for any reason the Radius is smaller than the Maximum Damage Radius (e.g. Deepcore 40mm PGL with the Overclock Hyper Propellant), then full damage will be done inside the Radius and no damage will be done between the Radius and Maximum Damage Radius.
| |||||||||||