Mirageionova (discusión | contribs.) (Página creada con «{{tep}} {{stub}} {{Creature Infobox | v1TabName = Common | name = Dreadnought Hiveguard | v1Image = Dreadnought Hiveguard…») |
Mirageionova (discusión | contribs.) Sin resumen de edición |
||
| Línea 3: | Línea 3: | ||
{{stub}} |
{{stub}} |
||
| + | {{Criatura TabBox |
||
| − | {{Creature Infobox |
||
| v1TabName = Common |
| v1TabName = Common |
||
| name = Dreadnought Hiveguard |
| name = Dreadnought Hiveguard |
||
Revisión del 17:33 10 feb 2021
| Esta es una traducción en progreso. El contenido y el formato de esta página pueden variar durante las próximas horas o días. |
 |
El contenido de esta página es un esbozo. Ampliándolo ayudarás a Deep Rock Galactic Wiki a mejorar. |
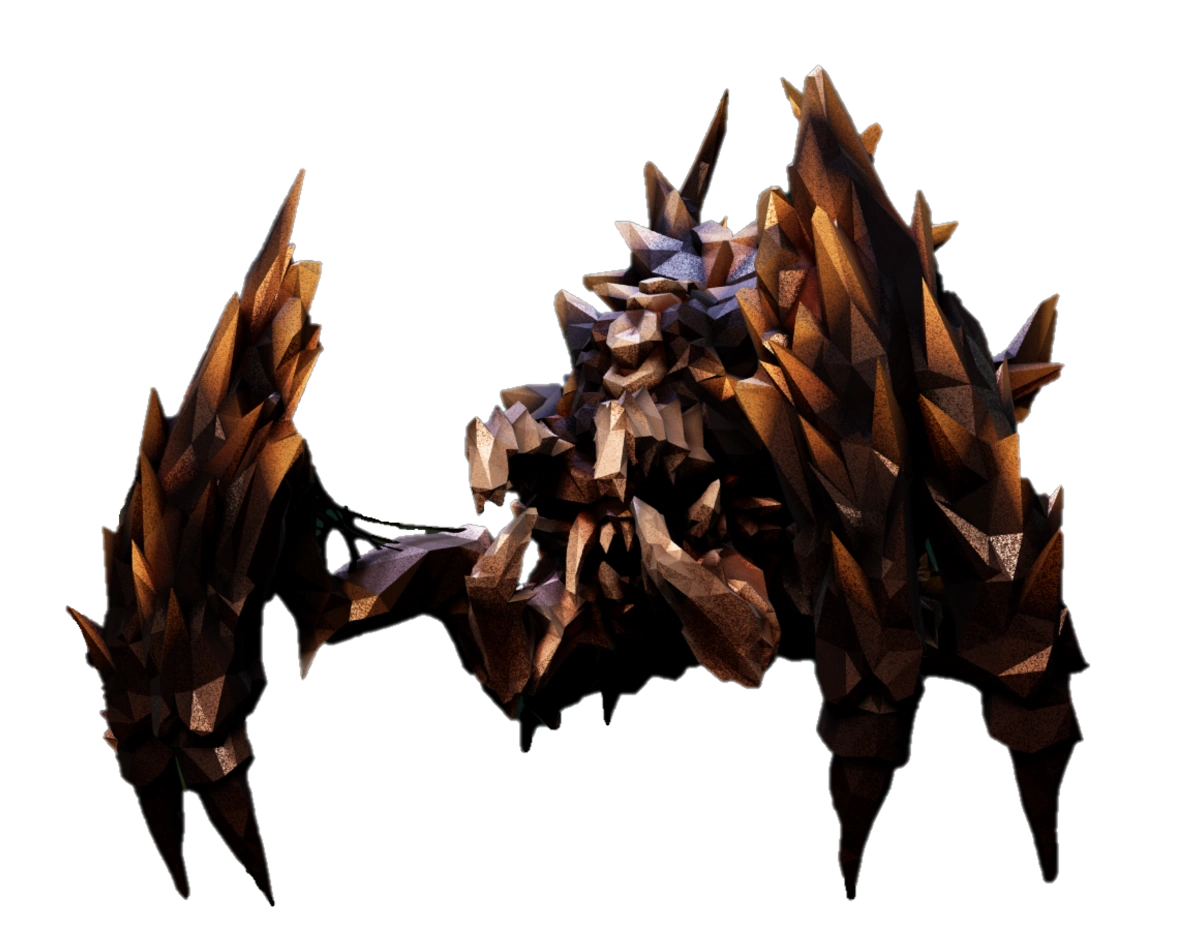
| Dreadnought Hiveguard | |
|---|---|
 | |
| Detalles de la criatura | |
| Especie | Glyphid |
| Bioma | All |
| Categoría | Boss Enemy |
| Combate | |
| Ataque(s) | Slash Bite Summon Reinforcements Fire Mortar Rock Burst Dig |
| Salud base | 5000 |
| Resistencia(s) | Ninguno |
| Debilidad(es) | Ninguno |
| Punto débil | Ninguno |
| Blindaje | Plantilla:Armor |
| Temperatura | |
| Caliente | Frío |
| T (quema) (°C) | T (congelación) (°C) |
| 1000° |
-490° |
| T (sofocado de llamas) (°C) | T (descongelación) (°C) |
| 100° |
-300° |
| Tasa de enfriamiento | Tasa de calentamiento |
| 30°/s |
400°/s |
| “ | The Dreadnought Hiveguard is an interrupted progression in the Dreadnought metamorphosis. Currently R&D is not in agreement on what the final form would be like but everyone agrees that it is bad enough. Besides its own attacks, the Hiveguard is able to summon reinforcements to aid it in battle. Previously unknown to us, these new Glyphids have been dubbed the Sentinels and they are very mobile and aggressive. The Hiveguard is slower than the basic Dreadnought buit it has even better survivability, exposing its vulnerable areas only occasionally and being completely immune to damage at all other times. Engage with extreme caution and plenty of ammunition. | „ |
| ~ Miner's Manual Description |
The Guardián de la colmena is a hostile creature encountered as a boss in the Elimination mission type. It has a 1 in 3 chance to spawn when the first Glyphid Cocoon is broken in the Elimination gamemode, where it will attack the Dwarves once it spawns. It also has a very rare chance to spawn during a swarm in other mission types.
The Hiveguard has a very spiky appearance, with it having a unique feature of dual claws on each front leg. It's slightly larger than the standard Dreadnought, and has 4 huge teeth as part of its mouth.
Similarly to its other Dreadnought counterparts it is heavily armored and has a variety of means to combat the Dwarves. It differs in the fact that it is not nearly as aggressive or fast, but should still be perceived as a major threat. It mainly relies on the fact that it has normally unbreakable armor, and it has enemy summons to deal with players. It has an armored abdomen that can only be broken under certain curcimstances.
When it appears, the Hiveguard will be accompanied by 3 Sentinels, who essentially keep the Hiveguard's abdomen shield intact. These sentinels are slightly larger than a Glyphid Grunt and have similar stats and behavior to the Glyphid Grunt Guard. Once all 3 sentinels are killed, the Dreadnought Hiveguard will drop its shield and will be vulnerable to attack. Once it takes enough damage, it will recover its shield and resummon the Sentinels.
It has some basic combat moves like Slash and Bite, with some ranged attacks. The Fire Mortar will launch damaging fireballs onto players, while the Rock Burst will create an area of hurtful rocks. Its Reinforcement ability will call in basic enemies to assist against the Dwarves, and the Summon ability spawns in Sentinels after its rear armor has been broken. It is capable of an evasive maneuver called Dig that will prevent it from taking damage for a while underground.
Combat
Health and Armor
| Effective
Health Scaling |
Hazard Level | |||||
|---|---|---|---|---|---|---|
| 1 | 2 | 3 | 4 | 5 | ||
| Player Count | 1-4 | 3500 | 5000 | 5500 | 6000 | 6000 |
Attacks
| AoE Projectile | |||||||||||||
|---|---|---|---|---|---|---|---|---|---|---|---|---|---|
| Area Damage | Hazard Level | ||||||||||||
| Normal Mission | DD | EDD | |||||||||||
| 1 | 2 | 3 | 4 | 5 | 3 | 3.5 | 4.5 | 5 | 5.5 | ||||
| Player Count | 10 | 14 | 24 | 40 | 56 | 24 | 30 | 46 | 56 | 60 | |||
| 10 | 16 | 26 | 43 | 60 | 26 | 32 | 49 | 60 | 64 | ||||
| 10 | 18 | 28 | 46 | 64 | 28 | 34 | 52 | 64 | 68 | ||||
| 10 | 20 | 30 | 50 | 68 | 30 | 36 | 56 | 68 | 72 | ||||
| Details | |||||||||||||
| Damage Type | Explosive | Plantilla:Area Damage
Radius: 2.5 m | |||||||||||
| Projectile | |||||||||||||
|---|---|---|---|---|---|---|---|---|---|---|---|---|---|
| Damage Amount | Hazard Level | ||||||||||||
| Normal Mission | DD | EDD | |||||||||||
| 1 | 2 | 3 | 4 | 5 | 3 | 3.5 | 4.5 | 5 | 5.5 | ||||
| Player Count | 5 | 7 | 12 | 20 | 28 | 12 | 15 | 23 | 28 | 30 | |||
| 5 | 8 | 13 | 21.5 | 30 | 13 | 16 | 24.5 | 30 | 32 | ||||
| 5 | 9 | 14 | 23 | 32 | 14 | 17 | 26 | 32 | 34 | ||||
| 5 | 10 | 15 | 25 | 34 | 15 | 18 | 28 | 34 | 36 | ||||
| Details | |||||||||||||
| Damage Type | Kinetic | ||||||||||||
|
| |||||||||||||
| AoE Projectile | |||||||||||||
| Area Damage | Hazard Level | ||||||||||||
| Normal Mission | DD | EDD | |||||||||||
| 1 | 2 | 3 | 4 | 5 | 3 | 3.5 | 4.5 | 5 | 5.5 | ||||
| Player Count | 25 | 35 | 60 | 100 | 140 | 60 | 75 | 115 | 140 | 150 | |||
| 25 | 40 | 65 | 107.5 | 150 | 65 | 80 | 122.5 | 150 | 160 | ||||
| 25 | 45 | 70 | 115 | 160 | 70 | 85 | 130 | 160 | 170 | ||||
| 25 | 50 | 75 | 125 | 170 | 75 | 90 | 140 | 170 | 180 | ||||
| Details | |||||||||||||
| Damage Type | Explosive | Plantilla:Area Damage
Radius: 1.2 m | |||||||||||
Tips
Gallery

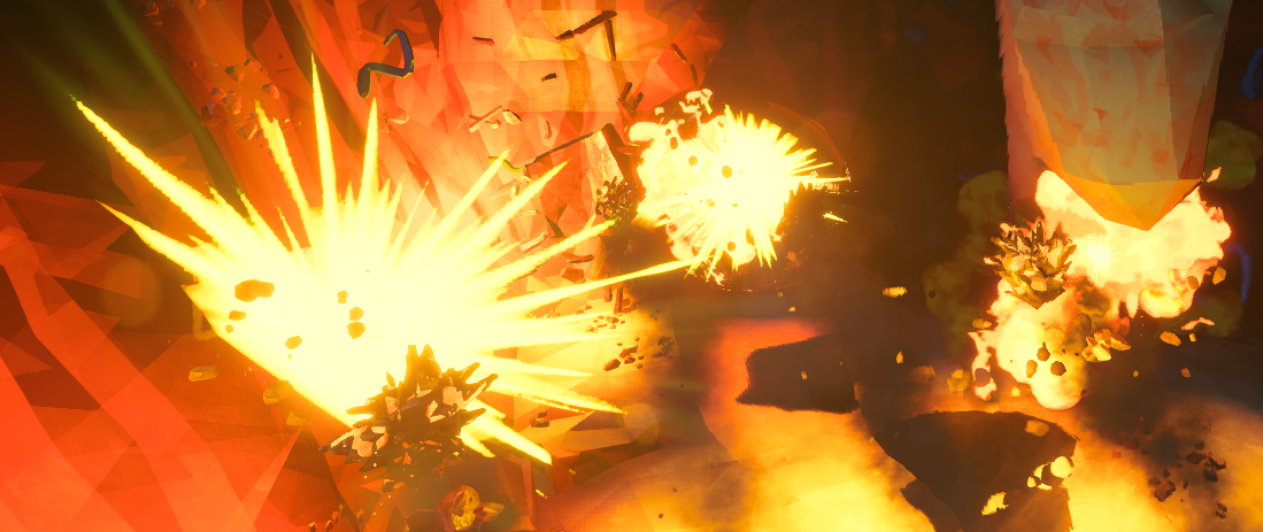
Hiveguard's Rock Burst (Rocks)

Hiveguard's Rock Burst (Explosion)

Trivia
Plantilla:Creatures nav